Monday, July 9, 2012

Mini Educational Reference: Remix Production Techniques


This Mini Educational Reference in Remix Production Techniques is a project that was created for my Master’s degree. It is a multimedia PDF file embedded with multiple screenshots and audio clips to demonstrate the processes and results of applying each of the production techniques.

The following Table of Contents provides a brief overview of the music production techniques that are demonstrated and explained in this Mini Educational Reference:

    Introduction                          4
    Funk Guitar Scratches            5
    Half Note Echo                      8
    Synth Pads                          15
    Tape Slowdown                   18
    Telephone Voice                  20
    Vocal Harmonies                 24
    Vocal Stutter                       28
    Vocoder                              31
    Complete Song Remixes       34
    Bibliography                        35


Download
Mini Educational Reference: Remix Production Techniques

Tuesday, January 3, 2012

Managing Chord Symbols, Drum Replacement & Track Import in Logic


Q: How are chord symbols entered into Logic’s Score Editor?
A: Type the desired chord symbol into the Score Editor (using the Chord object from the Part Box’s Text Group panel). By default, numbers in the chord symbol will be automatically placed into the Upper line. However, this automatic placement can be changed by using a comma – chord extensions before the comma will be placed into the Lower line while chord extensions after the comma will be placed into the Upper line.

Using the Chord object from the Part Box (left column), entering the text characters (in red) will result in different layouts, as shown by the chord symbols (in black).


After entering each chord symbol, press Tab to jump to the next note/rest/bar (complete all note entries PRIOR to this) for the following chord symbol.

The font, size and typeface of the Chord Root and Chord Extension can also be adjusted for better fit via Text > Text Styles.

The Chord Extension size has been increased (via the Text Styles window) to match the Chord Root size – compare the chord symbols above with the chord symbols in the first diagram.


Q: How do I enter a Diminished chord symbol and a Bar Repeat sign (for the chord symbol) into my Logic score? (Answer updated for Sibelius font.)
A: The Diminished symbol can be inserted as a text character simply by pressing Option-0 as you are entering the chord symbol itself.

However, the Bar Repeat sign for a chord will require the use of a music font such as Opus Chords (which comes with the Sibelius notation software):

1. Insert a standard Text object (instead of a Chord object) and press Option-3.
2. With the inserted Text object selected, go to: Text > Fonts and select the Opus Chords font and an appropriate font size.

Logic's Score Editor displaying a Diminished chord symbol and Bar Repeat sign.


Q: My chord symbols in the Score Editor are crooked – they are not placed in a straight line. How do I align my chord symbols neatly?
A: Chord symbols can be aligned vertically and horizontally.

For vertical alignment:

1. Adjust the first chord symbol to the desired vertical position (ensure that it remains selected)
2. Edit > Select Equal/Similar Events
3. Right-click (any selected chord symbol) > Align Object Positions Vertically

The “before” (top) and “after” (bottom) effect of vertically aligning chord symbols.


For horizontal alignment*:

1. View > Guides > All Objects
This step displays dashed Guide Lines to show the chord symbols’ current positions in reference to their actual time positions.
2. Select a chord symbol, followed by Edit > Select Equal/Similar Events
3. Align: Left-Aligned (via the Inspector’s Event Parameter box)
4. Horizontal Pos.: 0 followed by Option-Enter/Return
This step aligns ALL selected chord symbols to their entered time positions. Errors in time position entries can be corrected by dragging the chord symbols to their correct positions (as displayed in the yellow Help Tag) or by typing their new positions in the Event List.

* Steps 3 and 4 can be changed to other alternative settings, as appropriate.


The “before” (top) and “after” (bottom) effect of horizontally aligning chord symbols. The Guide Lines show random horizontal offsets in the chord symbols (top) but straighten out after adjustments in the Align and Horizontal Position parameters (bottom, left column).


Q: Can ties and rests in Logic’s Score Editor be entered in the same way as notation programs like Finale or Sibelius?
A: In general, MIDI sequencing-capable programs (such as Logic and Pro Tools) create ties by extending note durations (just like how a transcription would be based on a musical performance) while rests are automatically entered by the software to fill up the empty beats where there are no notes present. This is in contrast to notation programs (such as Finale and Sibelius) that often treat ties and rests as separate musical objects that must be entered (whether manually or automatically) into the score.

Instead of erroneously entering a slur, a tie can be created simply by extending the Duration Bar (in the Score Editor) or note length (in the Piano Roll Editor). With rests automatically created (where needed) by the Logic software, manual rest entries are not required, as indicated by the absence of rest events in the Event List.


Q: In the Piano Roll Editor, I can easily drag a note to change its position, duration and pitch. But is there an easy way to change the note velocity (other than switching to the Velocity Tool via the Tool menu)?
A: Yes, pressing the Command-Control keys (while hovering over a note in the Piano Roll Editor) changes the current mouse pointer into a Velocity Tool. This keyboard shortcut bypasses the Tool menu, which speeds up the note editing process considerably.

The mouse pointer changes into the Velocity Tool while holding the Command-Control keys.


Several other keyboard shortcuts (Logic 9 key commands) that may prove useful when combined with dragging include:

• Control and Control-Shift for finer and tick (finest) precision respectively - to override snapping when editing region/note positions or durations.
• Option-Shift to assign an identical value to a particular parameter (e.g. note velocity, note/region length, controller value) in all selected items.
• Option-Control to change the current mouse pointer into a Zoom Tool.
• Control-Shift in an Automation Track to change the current mouse pointer into an Automation Curve Tool.
• Control-Shift inside an audio region with dragging across the region boundary to create/edit a fade.


Q: I created a GM sequence using the QuickTime Synth in Logic. How do I convert my GM sequence into an mp3 file?
A: Apple’s QuickTime Synth is connected (virtually) in a similar manner as a hardware MIDI sound source would, whereby its audio outputs do not pass through the Logic software. As such, the External MIDI tracks used for the GM sequence cannot utilize Logic’s Bounce feature, since this process only applies to internal (e.g. Audio and Software Instrument) tracks.

In order to create an mp3 file, Logic’s GM sequence should first be exported into SMF* format before encoding it in iTunes.

* Standard MIDI File, often abbreviated as MIDI File and identified by a .mid extension in the file name.


To export Logic’s GM sequence into SMF format:

1. Select all regions (Edit > Select All [Command-A] or drag Pointer Tool over all regions)
2. Region > Merge > Regions per Tracks (ensure that all merged regions remain selected)
3. File > Export > Selection as MIDI File, then select the destination folder, name the file (with .mid extension) and click Save.

The “before” (top) and “after” (bottom) effect of merging MIDI regions.


To encode SMF into mp3:

1. Open the exported SMF in iTunes (or add the exported SMF to the iTunes Library) and check that the SMF (GM sequence) plays back correctly (proper MIDI channel headers are crucial here).
2. iTunes > Preferences, click General followed by Import Settings, Import Using: MP3 Encoder.
3. Ensure that the exported SMF remains selected and choose Advanced > Create MP3 Version.
The mp3 file will be saved by default into the Home/Music/iTunes/iTunes Music folder.

Click on the Import Settings button in the iTunes Preferences (top) and select MP3 Encoder in the resulting window (bottom).


Q: My kick and snare drum tracks sound thin – does Logic have any sound layering features that can thicken my drum recordings?
A: Yes, the Drum Replacement/Doubling feature was introduced in Logic 9 to address problematic audio drum tracks. For example, thin-sounding kick and snare drum recordings can be completely replaced by or doubled with MIDI triggered drum samples. These note triggers are automatically generated for transients that are above an adjustable threshold (with note velocities in proportion to the transient amplitudes) and are fully editable.

In addition, different Sampler Instruments can be selected from the Library tab to provide a range of sound (tonal) options.

To thicken a drum recording, select the relevant track and go to:
Track > Drum Replacement/Doubling (Control-D)

Drum Replacement/Doubling auto creates an EXS24 instrument track with MIDI notes (in the green region) to trigger samples for replacing/doubling drum transients. A list of Sampler Instruments in the Library tab (right column) is also available for more sound selection options.


Q: Is it possible to import audio regions from another Logic project?
A: Yes, the Track Import feature introduced in Logic 9, allows a selected track’s contents (such as regions) to be imported from one Logic project into another project.

Multiple types of project data can be selected for import, including:

• Track region or folder content (retains the region borders and timeline info)
• Plug-ins (including the parameter values)
• Sends (including level, routing and destination channel strips)
• Input/Output assignments
• Automation data
• Track notes

The Track Import feature can be accessed via the Media Browser tab (F) or File > Import (Command-I).

The Track Import view in the Media Browser tab provides options for selecting data types and tracks to be imported into a Logic project.


_____________________________________________________________________________________

__________________________________________________________________


Wednesday, December 14, 2011

Flexing Time in Logic


Q: What is Flex Time?
A: Flex Time is Logic's version of Elastic Audio (Pro Tools) or Audio Warp (Cubase). A Time Compression/Expansion (TCE) tool for manipulating digital audio, it is typically used to adjust the timing and tempo of audio recordings, samples and loops.


Q: Some of the audio recordings in my Logic multitrack session are not tight (out of sync). Can these timing problems be fixed without re-recording the tracks?
A: Yes, slack timing in your recordings can be tightened - simply enable Flex Time and manually drag the relevant transient to snap it to the bar/beat grid (or to the groove of another track). Alternatively, the selected audio region can also be quantized to automatically snap the detected transients to a quantization grid (result dependent on the audio content).

Similarly, imported audio loops may not always sync to the beat/groove of a project (loops may be slightly swung vs. straight feel, laid-back vs. edgy groove, etc). As with multitrack recordings, Flex Time can be applied in the same way to tighten the timing of these loops.
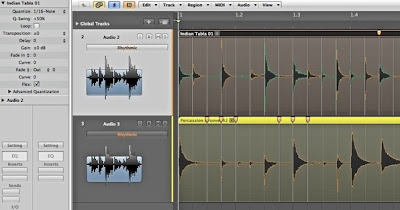
The Flex Markers in the lower region have been manually created from clicking/dragging while Flex Markers in the upper region have been automatically created from quantization (and further tightened with a manually adjusted Flex Marker on the right).


Audio recordings* from the above screenshot:

* A recorded clip of the full song context is available at the end of this article.


Q: How do I get started with Flex Time?
A: A simple 3-step process should get you started with Flex Time in Logic:

1. Click the Flex View button (in the Toolbar) to enable it, OR press command F. A Flex Mode button will appear in each audio track header.

2. Select a Flex Mode (click its button for the pop-up menu). The entire audio file(s) on that track* will then be analyzed, whereby detected transients will be indicated by Transient Markers (aka Event Markers in Pro Tools).

* Flex Time can also be independently enabled/disabled for individual audio regions on the same track, via the Flex checkbox in the Inspector.

3a. Dragging a Transient Marker will change it into a Flex Marker (aka Warp Marker in Pro Tools) and snap to the bar/beat grid (smaller subdivisions when zoomed in). The waveform display will turn green to indicate Time Compression** or orange for Time Expansion.

3b. Alternatively (to step 3a), select the audio region in the Flex Time-analyzed-track and apply an appropriate Quantize setting (via the Inspector). The relevant Transient Markers will turn into Flex Markers and snap to the selected quantization grid. As described above, the waveform display will turn green or orange to indicate Time Compression** or Time Expansion, respectively.

** However, if a Flex Marker time compresses an audio section to/to less than 12.5% (1/8) of its original length, the waveform display will turn (from green to) red in color.
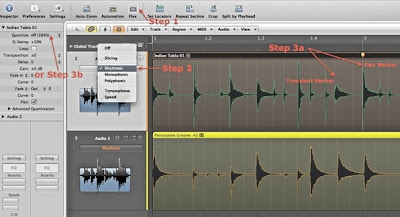
The 3-steps to getting started with Flex Time are found in the Toolbar (step 1), track header (step 2) and audio region (step 3a) OR Inspector (step 3b).


The Flex Time audio region will now follow tempo changes in the Logic project, just like a MIDI region would, and without changing the pitch either (unless the Speed/Tempophone Flex Modes have been selected).


Q: I can only snap my Flex Marker to the bar/beat grid. Is it possible to snap this marker to a rhythmic beat/groove on another track instead?
A: Yes, dragging a Flex Marker (from one track) over the audio region on another track, will snap it to either a Transient or Flex Marker on that second track (both tracks must be Flex Time enabled).
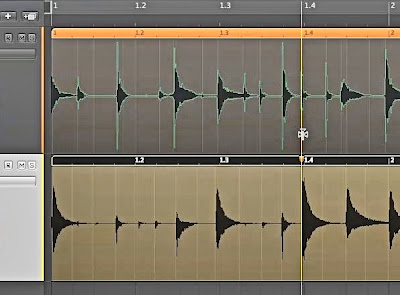
The Flex Marker from the lower track snaps to a Transient Marker in the upper track when it (Flex Marker) is dragged over the upper audio region.


This will make it possible for an audio track (such as bass or percussion) to lock to the groove of another track (such as a drum beat).


Q: How do I delete a Flex Marker?
A: Flex Markers which have been manually created (from dragging) or automatically created (from quantization) can be deleted through ONE of several methods:
• double-click on the Flex Marker
• Eraser tool
• control-click/right-click and select a Delete Flex Marker option
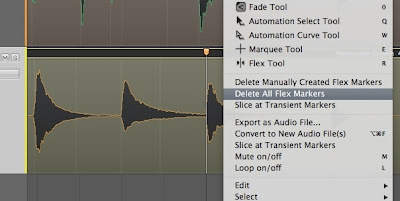
Control-click/right-click away from (not directly on top of) a Flex Marker to delete: all manually created Flex Markers only OR all manually and automatically created Flex Markers.


Similarly, a Flex Marker's position can be reset through the same method:
• control-click/right-click on the marker and select Set To Neutral Position
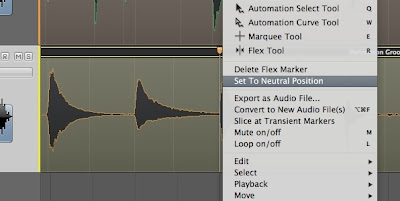
Control-click/right-click on a Flex Marker to delete it/reset its position.


Q: The various types of Flex Time pointers are so confusing - what do they mean?
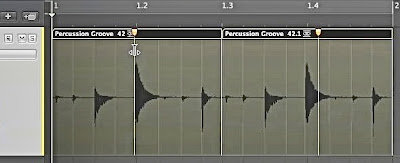
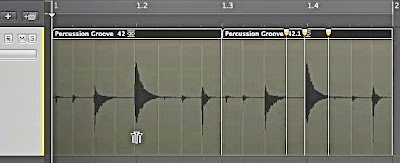
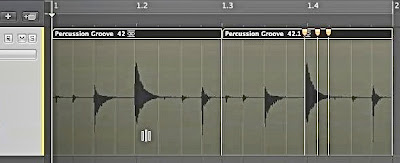
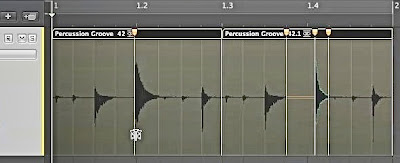
A: The following diagrams show various types of Flex Time pointers, the actions that produce them and their functions in Flex Time editing operations. Each screenshot displays a different pointer (before editing) in the left region while the right region illustrates the function of that pointer (after editing).
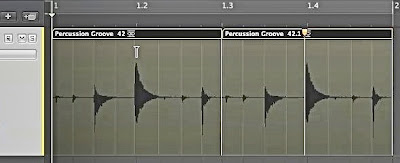
Action: Hover over Transient Marker in upper half of audio region (see left region).
Function: Click on top of selected Transient Marker to add new Flex Marker (see right region).
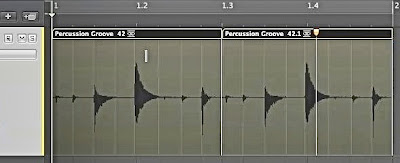

Action: Hover over background space in upper half of audio region (see left region).
Function: Click at current pointer position to add new Flex Marker (see right region).
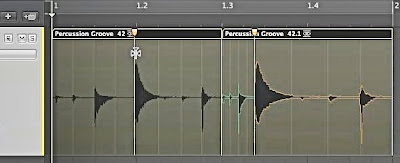

Action: Hover over Flex Marker in upper half of audio region (see left region).
Function: Drag left/right to move Flex Marker with TCE applied (see right region).

Action: Option-hover over Flex Marker in upper half of audio region (see left region).
Function: Drag left/right to only reposition the Flex Marker, with no TCE applied (see right region).

Action: Hover over Transient Marker in lower half of audio region (see left region).
Function: Click to add 3 new Flex Markers - on top of the selected, preceding and following Transient Markers (see right region).

Action: Hover over background space in lower half of audio region (see left region).
Function: Click to add 3 new Flex Markers - at current pointer position, and at the preceding and following Transient Markers (see right region).

Action: Hover over Flex Marker in lower half of audio region (see left region).
Function: Drag left/right to move selected Flex Marker with TCE applied, and add new Flex Markers at the preceding and following Transient Markers (if not already added), (see right region).
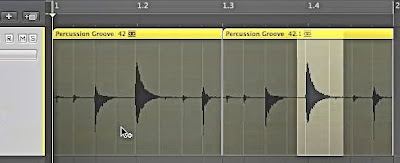

Action: Option-hover anywhere in lower half of audio region (see left region).
Function: Drag left/right to make a Marquee selection (see right region) or click to select the entire audio region.
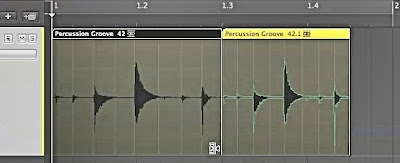

Action: Option-hover over lower L/R region corners (see left region) OR hover over upper L/R region corners.
Function: Drag left/right to move region border, with TCE applied equally to the entire audio region (see right region).


Q: There are too many Transient Markers in my audio region. How do I stop these markers from being generated by the small transients?
A: Transient detection sensitivity in Flex Time can be changed in the Sample Editor (via the Sample Editor button above the Transport Bar OR press W). Ensure that the Transient Editing Mode is enabled (indicated by an orange button), then click on the +/- button to increase/decrease the number of Transient Markers (similar to the Event Sensitivity parameter in Pro Tools).
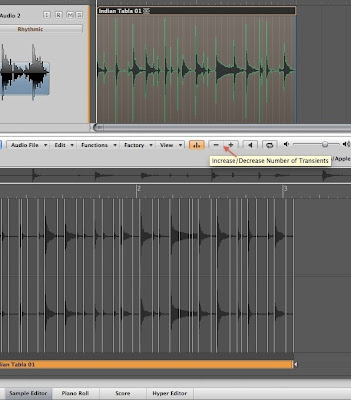
Enabling the Transient Editing Mode (orange button) will display the +/- buttons (indicated by a red arrow) that are used to increase/decrease the number of Transient Markers.


Transient Markers can also be moved, added and deleted in the Sample Editor. However, to reset the edited Transient Markers, go to:
• Audio File > Detect Transients


Q: What does the Varispeed function do?
A: Varispeed alters the playback/recording speed of the entire Logic multitrack project. It affects the audio (Flex-enabled or Flex-disabled) and MIDI tracks, loops and even video playback.

The Varispeed controls in the Transport Bar turn orange when enabled.


Some typical applications of Varispeed include previewing a multitrack project at a faster or slower tempo and transcribing/practicing/recording a performance at a lower speed.


However, the Varispeed controls are hidden by default but can be easily displayed:
• control-click/right-click the Transport Bar, select Customize Transport Bar, and enable the Varispeed display.


Q: What is Fade Playback Speed?
A: Fade Playback Speed is another tempo related function in Logic whereby region fade ins and fade outs can be speeded up and slowed down respectively. Independently selectable via the Region Parameter box in the Inspector, each option simulates the analog tape speedup or slowdown effect.
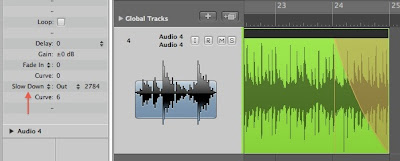
The orange fade out at the end of the region can be changed to a Fade Slow Down (indicated by the red arrow) in the Inspector.


Audio clip of the full song context for the various screenshots (with manual Flex Time editing applied to only the Tabla track), and the addition of a Fade Slowdown at the end:


_____________________________________________________________________________________

__________________________________________________________________

Tuesday, August 17, 2010

Using Multi-Timbral Instruments and Key Commands in Logic 9


Q: How do I apply a multi-timbral software instrument in Logic?
A: The new Logic Project Template v1.1 has been updated to include a multi-timbral setup in the Environment. The MIDI Channel of a Software Instrument channel strip has been set to All (to enable multi-channel operation) while a Multi-Instrument object has also been cabled to that Software Instrument channel strip, for multi-track access (via Logic's External MIDI tracks) to the multiple parts/channels of the assigned instrument plug-in.

The Logic Environment shows a Multi-Instrument object (bottom) connected to the Software Instrument 255 channel strip. With a multi-timbral instrument plug-in (e.g. Kontakt 4) inserted, Instrument 255 would be set to All MIDI Channels (in the left parameter box) for multi-channel operation.


However, due to the "Omni" (i.e. all) MIDI channel setting of the Software Instrument channel strip, any volume or panning changes on each channel will also cause the instrument channel strip to change its overall volume and pan accordingly. A multi-output instrument should then be used to provide independent volume and pan control - in the mixer, just click on the '+' button (below the solo button) to add Aux channel strips for accessing the additional outputs (automatically assigned) of the plug-in instrument.

The '+' and '-' buttons (in Inst 255) add and remove Aux channel strips to access the multiple outputs of the instrument plug-in. Meanwhile, the External MIDI tracks (on the right) are used to access the multiple parts of the multi-timbral instrument.


Q: I upgraded my Logic Pro 8 to Logic Pro 9. Are the key commands in Logic 8 and Logic 9 the same?
A: No, the Logic 9 key commands have been further streamlined for better consistency and to accommodate new features. However, upgrading from Logic 8 does not reset your key commands to those of Logic 9 (the existing Logic 8 key commands are retained).

To switch to the Logic 9 key commands, click on:
1. Preferences > Key Commands (Option K)
2. Options > Presets > U.S.

The U.S. Key Command Preset is different from Initialize All Key Commands, whereby it (U.S. preset) conforms to the Key Commands used in Apple's official Logic 101 book (Apple Pro Training Series: Logic Pro 9 and Logic Express 9 by David Nahmani).


Q: In Pro Tools, the Playback Cursor returns to the starting point when stopped (Insertion Follows Playback button deselected). Can Logic's playback do the same too?
A: Yes, Logic's playback controls can be customized to enhance workflow. For example, the Logic Pro 9 Preferences v2.0 download contains several additional Key Commands to complement the standard Spacebar (Play or Stop) shortcut:

• Command Spacebar (Play or Stop and Go to Last Locate Position)*
* Logic's playback will now behave like Pro Tools as described above. However, this keyboard shortcut is also used for the Show Spotlight Search Field and would have to be disabled (via the following) to avoid conflict:
Mac OS X v10.6 (Snow Leopard): System Preferences > Keyboard > Keyboard Shortcuts > Spotlight
Mac OS X v10.5 (Leopard): System Preferences > Keyboard & Mouse > Keyboard Shortcuts > Spotlight
This will also enable the same shortcut to be used to toggle the record button in Pro Tools.

• Option Spacebar (Stop or Play From Last Position)

The Command Spacebar shortcut for Show Spotlight Search Field (in System Preferences) should be disabled or changed, to avoid conflict with the same Pro Tools or Logic (customized) key command.


Other existing and new Key Commands (in the Logic Pro 9 Preferences v2.0 download) that may be useful include:
• Shift Enter (Play from Selection)
(Shift Fn Return for laptops)

• > / < (Forward / Rewind)

• Option > / < (Forward / Rewind by Transient)
(Logic's equivalent to Pro Tools' Tab To Transients shortcut)

• Option Control → / ← (Zoom Horizontal In / Out)
• Option Control ↓ / ↑ (Zoom Vertical In / Out)

• R (Record), C (Cycle Mode), S (Solo Mode), K (Metronome Click), M (Mute), Control S (Track Solo), Control M (Track Mute), G (Global Tracks), Esc (Tool Menu), I (Inspector), Control Z (Auto Track Zoom), A (Track Automation), Command F (Flex View)

• various Editor, Lists and Media pane toggles:
X (Mixer), P (Piano Roll), N (Score), E (Event), Option M (Marker), T (Tempo), U (Signature), B (Bin), O (Loops), Option L (Library), F (Browser)

For a complete list of Logic Key Commands, go to:
Preferences > Key Commands (Option K)

Logic's Key Commands list can be easily customized (add/change/delete) via the Learn and Delete buttons on the right.


Q: The Help files in Logic 9 are very slow. Is there any way to speed up this sluggish response?
A: The sluggish HTML Help files in Logic 9 (and in other Logic Studio applications) can be substituted with the PDF version of the same user manuals. These PDF files are far more responsive and can be downloaded via the Logic Studio Resources webpage at:

The Logic Pro 9 User Manual is one of many PDF manuals for Logic Studio that is available for download from Apple's website.


Q: Some of the factory presets from Logic 8 and Logic 7 have been altered or are no longer found in Logic 9. Do you still have those old presets?
A: The older Logic presets can be found in the Logic 6-8 Settings download, which contains Channel Strip Settings, Plug-In Settings and Sampler Instruments copied from previous versions of Logic, e.g. the original version of Eighties Metal (Channel Strip Setting from Logic 8) and In Yo Face (Guitar Amp Pro Plug-In Setting from Logic 7).


Q: Whenever Logic starts, a bouncing folder icon named CoreMIDIServer.framework appears in my Dock. What is it and how can I get rid of it?
A: The CoreMIDIServer.framework icon bounces in the Dock whenever Logic (or other non-Pro Tools MIDI applications) is launched. It is caused by the DigiDioMidiDriver.plugin installed by Pro Tools 8.0.3, which is for use with the Digi 002 and 003 family interfaces.

The CoreMIDIServer.framework icon that appears in the Dock is caused by *Digidesign's MIDI driver.
* Digidesign is now known as Avid.


However, this bouncing CoreMIDIServer icon has been resolved in Pro Tools 8.0.4 and does not appear anymore in the Dock. To ensure maximum compatibility, users are advised to upgrade to Pro Tools 8.0.4 (instead of deleting the MIDI driver).


Q: After typing-in new parameter values, plug-ins in WaveBurner 1.6 still revert back to their previous values (i.e. typed, plug-in parameter values do not stick). Can this problem be fixed?
A: Yes, simply upgrading WaveBurner 1.6 (CD mastering software in Logic Studio) to v1.6.1 will allow plug-in parameter values to be typed-in and retained. In addition, the WaveBurner 1.6.1 update also includes bug fixes for inconsistent waveform display in the Mix Lane, WaveBurner hanging (freezing) when the Digidesign audio driver is selected, etc.

The WaveBurner 1.6.1 Update installer can be downloaded from:


_____________________________________________________________________________________

__________________________________________________________________

Friday, January 1, 2010

Logic Studio and Logic Pro 9: Enhanced & Refined


Q: What is contained in the new Logic Studio?
A: The new Logic Studio comes in a physically smaller box (compared to the previous Logic Studio as the printed manuals are no longer included) but the software content has been increased to 9 DVDs, requiring a total of 47GB in hard disk space:

• 1 DVD (9GB) of applications and required content (Logic Pro 9, MainStage 2, Soundtrack Pro 3, Compressor 3.5, WaveBurner 1.6, other utility applications, etc.)

• 7 DVDs (38GB) of optional sound library content, some of which can be installed onto an external hard drive (Jam Pack collections, sound effects, surround music beds, EXS24 samples, impulse response files, etc.)

• 1 DVD of demo content

The smaller Logic Studio box now includes a set of 9 DVDs and 3 booklets (installation and exploration guides).


Q: Are there any changes to the new Logic Studio pricing?
A: The pricing structure for the new Logic Studio (containing Logic Pro 9) remains the same as the previous Logic Studio (with Logic Pro 8):

• Logic Studio Full Version: US$499
• Upgrade from an earlier Logic Studio/Logic Pro: US$199
• Upgrade from Logic Express: US$299

Meanwhile, the pricing for Logic Express 9 also remains the same as before:
• Logic Express 9 Full Version: US$199
• Upgrade from an earlier Logic Express: US$99


Q: What are the new features in Logic Pro 9?
A: On the surface, Logic Pro 9 looks and feels very similar to Logic Pro 8. Although there are more than 200 new features and enhancements in the new Logic Studio, most of the changes in Logic Pro seem to have been made deeper down under the hood.

At first glance, the most visible changes in Logic Pro 9 include the:

• Bold white frame: Highlights the active area of the window (i.e. window area with key focus).

• Flex Time (via the Flex toolbar button): Logic's equivalent to Elastic Audio in Pro Tools and Audio Warp in Cubase. This feature allows different parts of an audio region to be time-stretched/compressed (without changing the pitch), e.g. to correct/tighten the timing of an audio recording.

• Notes area (via the Notes toolbar button): Provides both Project and Track Notes for comments.

A white frame surrounds the main Arrange area in the center, with Flex Editing applied on the selected track while the Notes area is on the right.


Further exploration in Logic Pro 9 will reveal more changes, and some of the more significant ones include:

• Varispeed: Varies the playback speed of the entire project (including Flex-disabled audio tracks). Acting much like a tempo control for audio recordings, Varispeed is my favorite new feature in Logic Pro 9, with 3 modes available for selection:

- Speed Only (i.e. no change in pitch)
- Varispeed (Speed and Pitch)
- Varispeed and MIDI (transposes non-drum MIDI notes to the nearest semitone to match the pitch-shifted audio tracks)

While Varispeed (Speed Only) has received highly encouraging feedback from my colleagues and myself, its parameter controls are hidden by default but can be easily displayed by customizing the Transport Bar.

The Varispeed controls in the Transport Bar turn orange when enabled.


• Click Zones: This is Logic’s equivalent to the Smart Tool in Pro Tools, but with an additional Loop tool. Enabling the Fade Tool Click Zones and the Marquee Tool Click Zones preferences will allow the mouse pointer to change into 5 different tools (Fade, Loop, Pointer, Marquee and Resize) when moving it vertically along the end border of an audio region.

• Amp Designer and Pedalboard: These are 2 effects plug-ins which have been specially developed for guitarists. The Amp Designer allows a mix and match of amp heads, EQs, reverbs, speaker cabinets and mics while the Pedalboard provides various types of stompboxes.

The Amp Designer (top) and Pedalboard (bottom) plug-in windows in Logic Pro 9.


• Drum Replacement/Doubling: Replaces or doubles problematic audio drum tracks with EXS24 samples triggered by MIDI notes. These trigger notes are automatically generated for transients above an adjustable threshold (with note velocities in proportion to the transient amplitudes) and are fully editable.

Drum Replacement/Doubling auto creates an EXS24 track with MIDI notes (in green region) to trigger samples for replacing/doubling the drum transients. Different Sampler Instruments can also be selected from the Library list on the right.


• Convert Regions to New Sampler Track: Assigns slices of an audio region to different notes of a new EXS24 instrument. These assigned notes will be automatically inserted into a MIDI region to trigger all slices for seamless playback. Alternatively, the audio slices can be resequenced or used for creative effects such as vocal stuttering.

Convert Regions to New Sampler Track auto creates an EXS24 track with ascending MIDI notes (in green region) to trigger every slice of the audio region (which is then muted) for seamless playback (or for further editing).


Instead of audio slices, an entire audio region can also be assigned to a note for real-time triggering.

• Chord Grids: The Chord Grid Library comes with more than 4,600 chords for use in the Score editor. Meanwhile, the Chord Grid Editor can be used to edit and add new chord grids to the library.

The Chord Grid Selector displays all the chords in the Chord Grid Library and can also playback the selected chord for preview.


• Duration Bars and Guides: The Duration Bars show MIDI note lengths in the Score editor and can be graphically edited while the Guides option displays the horizontal alignment of musical symbols (chord symbols, dynamic markings, etc.) to their assigned beat positions.

The selected note (highlighted in magenta color) has a shorter Duration Bar while the Guide for the A chord symbol (in the same measure) indicates a horizontal position offset.


• Jam Pack Voices: Consisting of 1,700 Apple Loops and numerous Channel Strip Settings and Sampler Instruments, this latest Jam Pack collection has now been included into the new Logic Studio library.

Many more new features and enhancements have been incorporated into Logic Pro 9 but they are just too numerous to list.


Q: Are there any changes in the new MainStage?
A: Yes, Logic Studio now contains MainStage 2, whereby some of the changes include:

• A streamlined user interface: Divided into the Patch List on the left, Channel Strips on the right, Workspace in the top center and Inspectors in the bottom center of the window.

The MainStage 2 user interface (in Edit Mode) consists of the Patch List on the left, Workspace at the top, Inspectors at the bottom and Channel Strips on the right.


• All plug-ins: Includes all previously unavailable high latency effects except surround plug-ins. E.g. Pitch Correction has now been made available for use in MainStage 2. The cumulative plug-in latency for each channel strip will also be displayed (in ms) above the name label.

• Playback and Loopback: These are 2 live performance plug-ins which are only applicable to MainStage 2 (not available in Logic Pro 9). Playback is an audio file player which can playback backing tracks while Loopback is a live loop recorder which can record and overdub audio signals to create loops spontaneously onstage.

The Playback (top) and Loopback (bottom) plug-in windows in MainStage 2.


• Screen Controls Palette: Contains a bigger selection of Screen Controls (when in Layout Mode).

The Screen Controls Palette contains a total of 60 Screen Controls.


Q: What are the changes made to the Logic Pro 9 Project Template and Preferences downloads?
A: The new Logic Project Template v1.0 has been updated for use in Logic Pro 9, with Varispeed controls added to the Transport Bar, Duration Bars and Guides enabled in the Score editor, etc.

Meanwhile, the new Logic Preferences v1.0 file has also been updated for Logic Pro 9, with Click Zones enabled, key command assignments for Forward and Rewind By Transient (Logic's equivalent to Tab To Transients in Pro Tools), etc.

As with previous Logic Project Templates and Preferences, downloading the files would require placement into the appropriate folders:

• Unzip the Logic template download and drag & drop the Project Templates folder (containing the Logic 9 template) into:
Users/your user account/Library/Application Support/Logic


• Drag & drop the Logic Preferences file into (replace the existing file):
Users/your user account/Library/Preferences

_____________________________________________________________________________________

Logic Pro 9 downloads:

Project Template v1.0

Preferences v1.0

__________________________________________________________________