Friday, October 31, 2008

Making Sense of Logic 8


Q: Logic 8 is so different from Logic 6... I don't know how to use Logic anymore.
A: Although Logic 8 is quite different from previous versions of Logic, it is not necessarily more difficult. It just looks more complex (e.g. with several additional buttons in the Toolbar) compared to older versions of Logic, but many of these additions simply make various features easier to access with 1-click buttons (instead of navigating through multi-layered menus).

Buttons are also used to toggle (open/close) various retractable panes within a consolidated Arrange window. This single-window design greatly reduces screen clutter from opening too many separate windows.

Dividing the consolidated Arrange window into different areas will help reduce the confusion over having too many controls. The main Arrange area (tracks and timeline) is the center of the window and is surrounded by the Toolbar (function buttons) at the top, Inspector (parameter boxes and dual channel strips) on the left, Transport Bar and Editor at the bottom, and Lists/Media browser on the right.

Consolidated Arrange Window: The Arrange area in the center is surrounded by the Toolbar (top), Inspector (left), Transport Bar and Editor (bottom), and Lists/Media browser (right).


Q: When the Jazz Kit instrument is loaded into the EXS24, there was an error message, "Audio file not found!" Why does this happen?
A: The "Audio file not found!" error message pops up because the required audio sample files are missing from the hard disk. Occasionally, reinstalling the sample library over the existing files helps but there is no guarantee that this will solve the problem.

The most reliable way is to manually copy the missing folders into the relevant Logic/GarageBand sample library. However, a 3rd-party software such as Pacifist would be required for this task. A US$20 shareware application, Pacifist (www.charlessoft.com) can open the Logic installer package and extract individual folders/files out of the installer DVDs.

Using Pacifist is a fairly simple process:
1. Click on the Open Package button.
2. Select Install Logic Studio (from the Logic installation DVD). Pacifist then loads the contents of the Logic Studio package.
3. Copy the name of the missing sample (from Logic's error message) into Pacifist's Find box. The search will locate the missing sample from the Logic Studio package.
4. Extract/drag the parent folder (containing the missing sample) into the relevant subfolder in this location:
Library/Application Support/Logic/EXS Factory Samples
or
Library/Application Support/GarageBand/Instrument Library/Sampler/Sampler Files
The audio sample files should now load properly the next time that same EXS24 instrument is selected again.

Interestingly, all the missing samples that I have had were from the GarageBand sample library. And when I performed a complete (instead of multiple partial) Logic Studio installation on another computer, I did not experience any missing sample at all.


Q: Do I need to update my Logic Studio software?
A: All users are advised to install the latest Logic software updates. Currently, there are 4 Logic Studio updates available - Logic Pro 8 (including Waveburner and Impulse Response Utility), MainStage, Soundtrack Pro 2 and Pro Applications (including Compressor 3) updates.

Meanwhile, there is also 1 Logic Express 8 update for users of that software.


Q: How can I add a guitar tab to standard music notation?
A: Selecting the Guitar Mix Score Style from the Display Parameter box will show the guitar tablature above a standard music staff. To display the guitar tab only (without the music note display), select the Guitar Score Style instead.

Guitar Mix Score Style: Displays music notation using a Guitar Tablature and Treble (-8) staff. The new Project Template also contains Guitar Mix 2 which uses a Guitar Tablature and Treble staff instead, i.e. 1 octave higher than the Treble (-8) clef.


Q: What has been updated in the new Logic Project Template and Preferences file?
A: Logic Project Template v1.1 contains changes to the track name displays, default Project Setting for Overlapping Recordings as well as new Guitar and Bass Tab/Mix Score Styles.

Meanwhile, Logic Preferences v1.1 have been updated with a couple of new key commands.


Q: What is the best way to insert a reverb plug-in?
A: This answer was originally posted in a previous Logic Notes article, Reverberation Logic, but the procedure has now been updated for Logic 8.

A reverberation effect is typically shared by multiple instruments. As such, it should not be put into an individual track’s Insert slot. Since a reverb plug-in usually consumes more processing power than an average plug-in, an insert effect system (which requires a separate plug-in for each track) will only put unnecessary strain on the host computer’s CPU.

Reverb is more commonly used as an aux send effect. Setting up this effect bus will enable a single plug-in to be shared by multiple tracks:

1. Select the desired Audio or Software Instrument track.
2. From the selected tracks' channel strip (left strip) in the Inspector, select an unused Bus (with the default Post fader option) in the Sends slot.
3. From the Aux channel strip (right strip) in the Inspector, select the desired reverb plug-in in the Inserts slot.
4. Adjust the Send Level knob in the assigned track's channel strip (left strip) together with the Aux Volume fader (right strip) for the desired reverb mix. (Also ensure that the plug-in’s dry/wet (direct signal/reverb effect) balance, is set to 100% (i.e. no dry signal) for maximum effect.)
5. Repeat steps 1, 2 (select the same Bus) and 4 to assign other tracks to share the same reverb plug-in.

Aux Send Reverb: Mixer shows the Space Designer plug-in inserted into the Aux 1 channel, with 6 Audio and Software Instrument tracks sending various signal levels into Bus 1 (which is input into Aux 1).


Q: How can I make audio regions follow Logic's project tempo?
A: If the audio file was recorded in the same project, simply enable the Follow Tempo checkbox (in the Region Parameter box). However, this Follow Tempo option is not available for imported audio files.

Alternatively, audio and MIDI regions can also be Time Stretched/Compressed by option-dragging the Resize Tool (at the bottom right corner of the region). This feature will then "make audio regions follow Logic's project tempo".


_____________________________________________________________________________________

Logic Pro 8 downloads:


__________________________________________________________________

Friday, August 22, 2008

The Logic Pro 8 Project Template


Q: What is a Logic Project Template?
A: A Project Template is a Logic 8 file which provides a default starting point for your music projects. The Logic Notes downloadable template contains customized window layouts and zoom levels, track colors, a pre-configured GM QuickTime Synth as well as a hidden automation setting, among other things.


Q: Is the Logic 7 Song Template compatible with Logic 8?
A: Logic 7 Song Templates can be opened in Logic 8. However, due to the new consolidated Arrange window in Logic 8 (which greatly simplified window layouts), many Screensets may not display the various windows correctly but would otherwise, still be largely functional.

On the other hand, Logic 8 templates are not backward-compatible (i.e. cannot be opened) with the older Logic 7.


Q: What are Screensets?
A: Screensets are customized screen layouts of Logic windows that can be stored and recalled just by pressing a number on the computer keyboard. The Logic Notes Project Template contains 9 Screensets which have been adapted and updated for Logic Pro 8 on the 15” MacBook Pro (1440x900 pixel screen resolution):

Screenset 1: Arrange
A general-purpose Arrange window whereby all the consolidated features can be opened for use at the click of a button.

Screenset 1


This Project Template has also been assigned various track colors, which are in contrast to the dull green regions in Logic's default templates. Simply click on the New Track and New Track With Duplicate Setting buttons to add more "colored" tracks (up to 24 Audio, 16 Software Instrument and 16 External MIDI track colors).

Screenset 2: MIDI Editing
Designed to show the interrelationships between the separate Event List, Score Editor and Piano Roll Editor when editing MIDI notes.

Screenset 2


Screenset 3: Consolidated Score
Takes advantage of the consolidated features of the main Arrange window to display the integrated Score Editor and Event List.

Screenset 4: Consolidated Piano Roll
Similar to the previous screenset in which the Piano Roll Editor and Event List are incorporated into the main Arrange window.

Screenset 5: Large Score
Utilizes a separate Score Editor window for large, music notation displays.

Screenset 6: Large Piano Roll
Similar to the previous screenset but using a large, separate Piano Roll Editor window instead for graphical editing of MIDI notes.

Screenset 7: Mixer
A consolidated Arrange window incorporating a Mixer.

Screenset 7


In addition to mixing, Screenset 7 also provides an easy method for inserting channel headers into External MIDI tracks. Simply pause-record at the start of the sequence and click on the desired mixer controls such as Program, Volume, Pan and Reverb.

However, the MIDI Automation Mode required to capture these mixer settings has been removed in Logic 8 and is not available anymore. Fortunately, this Project Template is able to exploit a Logic 8 loophole whereby the previously selected MIDI Automation Mode from Logic 7 still works, although it is now displayed as a question mark instead. And of course, the MIDI Automation Mode can also be used for recording real-time (i.e. live) mixer changes directly into MIDI Regions.

Screenset 8: Global Tracks
Displays the main Arrange window with all Global Tracks enabled.

Screenset 9: Audio Mixer Environment
Displays the Audio Mixer layer in the Environment window.


Q: What is the Logic preferences file used for?
A: This preferences file stores Logic's program preference settings such as its audio, display and Key Command (i.e. shortcut) settings. The Key Command list includes a "shorter" keyboard shortcut for Close Project as well as several new shortcuts, e.g. Play From Beginning, Select Overlapped Regions (to check for overlaps) and Align Object Positions Vertically (to align chords symbols in the Score Editor, especially useful for MT010 Assignment 2).


Q: There are 2 files available for download. Where should I place them after downloading?
A: The Logic template is named Autoload.logic and must be located inside a Project Templates folder while the preferences file is named com.apple.logic.pro.plist.

Just unzip the template download and drag & drop the Project Templates folder (containing the Logic 8 template) into the following location:
Users/your user account/Library/Application Support/Logic

Meanwhile, the Logic preferences file should be dropped into a DIFFERENT folder (replace the existing file):
Users/your user account/Library/Preferences

The downloaded Project Template will then be available for selection when a new file is opened (File>New) - just click on My Templates folder, and select the Autoload template.

As this is version 1.0 of the Logic Pro 8 template and preferences, updates would be expected as improvements to the layouts and settings are made, based on user feedback. And to the new users, welcome to Logic 8!

_____________________________________________________________________________________

Logic Pro 8 downloads:

Project Template v1.0

Preferences v1.0

__________________________________________________________________

Monday, January 7, 2008

Logic Studio: Giving More For Less


Q: Is it worthwhile to upgrade to Logic Studio?

A: This is the most frequently asked question that I get from ICOM students. Considering that Logic Studio consists of a software bundle of 7 audio production tools, with the software contents coming in 8 DVDs and taking up about 46GB of hard disk space when fully installed, all of which retails for less than half the price of the old Logic Pro 7... the answer is a foregone conclusion! (Yes, it is most definitely a highly worthwhile purchase/upgrade.)

Apple's comprehensive package at such an attractive price makes Logic Studio so tempting that many users would most likely overlook Logic Express 8!

Logic Studio: Apple's new flagship audio production suite includes the latest Logic Pro 8.


Q: How much is "less than half the price" (as mentioned above)?
A: Logic Studio retails at US$499 while the last published price of Logic Pro 7 was US$1,299. Meanwhile, the Logic Studio upgrade from Logic Express 7 costs US$299 (US$199 if upgrading from Logic Pro 7).

Of course, all ICOM students are eligible for special educational discounts via the college while new ICOM students are expected to get Logic Studio in their m-Mobility package.


Q: What are in the 8 DVDs? Why do they take up 46GB of hard disk space?
A: There is 1 DVD which contains the applications and tools (Logic Pro 8, MainStage, Soundtrack Pro 2, Studio Instruments, Studio Effects, Utilities, etc.), 6 DVDs containing the sound libraries (Jam Pack collections, sound effects, surround music beds, EXS24 samples, impulse response files, etc.) and 1 DVD containing the demo content.

DVDs "R" Us: The bulky but compact box contains a set of DVDs and manuals for the various applications and sound libraries that are in the Logic Studio package.


Logic Studio's standard installation requires 7GB of free hard disk space while it is the optional audio libraries that require a whopping 39GB! But fortunately, these can be installed onto an external hard drive which will free up disk space on the internal drive.


Q: What are the 7 audio production tools that are included in Logic Studio?
A: Logic Studio's audio production tools include the following:

1. Logic Pro 8 - The primary application in the Logic Studio package. A music production tool that integrates digital audio, MIDI sequencing and music notation into 1 application.

Logic Pro 8*: The new face of Logic.


2. MainStage - A new application that provides an easy-to-view interface designed specifically for live performance.

MainStage*: The nice, big display makes the window easy to read while on stage.


3. Soundtrack Pro 2 - An application optimized to perform audio post-production for film and video.

Soundtrack Pro 2*: Simplifies the audio post-production process of creating soundtracks.


4. Studio Instruments - A large collection of software instrument plug-ins, with several updated instruments including Ultrabeat, EXS24, Sculpture and ES2.

5. Studio Effects - A large collection of effect plug-ins, with the new Delay Designer, Surround Compressor and many more updated plug-ins.

New Effect Plug-ins*: The Delay Designer (left) is a multi-tap delay plug-in while the Surround Compressor (right) is a multi-channel compressor plug-in.


6. Studio Sound Library - A huge (39GB) collection of optional audio content: 10GB for Jam Pack collections, 16GB for sound effects, 6GB for surround music beds and 7GB for other optional content (EXS24 samples, impulse response files, etc).

7. Utilities - A software bundle of several utility applications: WaveBurner 1.5 for CD mastering, Compressor 3 for surround sound encoding, Impulse Response Utility for creating Impulse Response files, Apple Loops Utility for converting audio files into Apple Loops as well as an upgrade to QuickTime 7 Pro for additional audio and video export options.


Q: What's new in Logic Pro 8?
A: A major change in Logic Pro 8 is in its new user interface - it is based on a single-window design with a consolidated Arrange window. Retractable panes minimize the clutter of opening multiple windows whereby the mixer and graphic editors can now be selectively displayed below the Arrange area, media browsers and list editors on the right and the Inspector on the left (for parameter settings and dual channel strips).

Consolidated Arrange Window*: Logic 8's new single-window interface.


Also new in Logic Pro 8 is the multitake recording feature. Expandable take folders are automatically created during the recording process and can be manipulated (moved, edited, etc.) just like the audio regions. Complementing this is Quick Swipe comping, which easily builds an ideal composite track simply from the selections of the best takes (or sections of each take).

Logic Pro 8 has made it even easier to time-stretch/compress an audio region (without changing the pitch) simply by option-dragging the region-end directly in the Arrange window. In addition, Apple has also replaced the XSKey (a USB dongle) with a serial number, thus freeing up a USB port and reducing the hassle of carrying an extra piece hardware.

XSKey: The old Logic Pro USB dongle is history now as it is no longer used in Logic 8.


Q: What are the changes to Logic Express 8?
A: Firstly, Logic Express 8 retails at US$199 while the last published price of Logic Express 7 was US$379. (The upgrade price from Logic Express 7 is US$99.)

In terms of features, Logic Express 8 shares a similar user interface as Logic Pro 8, with changes such as the new consolidated (single-window design) Arrange window, multitake recording, Quick Swipe comping and easy option-dragging of region ends directly in the Arrange window to time-stretch/compress audio regions (without changing the pitch).

Several plug-ins that were previously available only in Logic Pro 7 are now available in Logic Express 8. The Ultrabeat, ES2, Pitch Correction and Ringshifter are new plug-ins while the EXS24, Guitar Amp Pro and Channel EQ with FFT analyzer are upgrades from stripped-down plug-ins.

Ultrabeat: A drum machine/synthesizer plug-in that is now available in Logic Express 8.


Logic Express offers an inexpensive way to get started with Logic but with the narrowing price difference, Logic Studio has stolen the limelight with its massive audio production package. Apple has left the competition to play catch-up and it will be interesting to observe how the market reacts to this new development over year 2008.


* Picture courtesy of Apple.

_____________________________________________________________________________________

Logic 7 downloads:

Logic Pro template v1.2
OR
Logic Express template v1.2

Logic Pro preferences v1.1
OR
Logic Express preferences v1.1

Read Me (template and preferences)


Plug-in presets from Logic Platinum 6

Read Me (plug-in presets): refer to Q3
__________________________________________________________________

Monday, September 3, 2007

Reverberation Logic


Q: What is reverberation?
A: Reverberation is one of the most commonly used effects in music. Also known as reverb, it is the natural reflection of sound in an acoustic space. As a microphone typically captures only the direct sound from the source (without the room reflections), recordings without any reverb mixed in will sound very dry and unnatural. On the other hand, too much reverb will simply smear up the clarity of the mix, making it sound like the neighbor's karaoke nightmare (often with maximum effects to mask the bad singing)!


Q: Does Logic have any reverberation effect?
A: Yes, Logic comes with several reverb plug-ins such as PlatinumVerb, GoldVerb, SilverVerb, EnVerb and AVerb. However, the Space Designer is only available in Logic Pro while the Apple QuickTime synthesizer also has a built-in reverb effect.

Premium Reverb Plug-in: The PlatinumVerb is a powerful reverb plug-in that is available in both Logic Pro and Logic Express.


Reverb from External Synths: Built-in reverb from the QuickTime synth (an external device) can be dialed-in via the Track Mixer’s Reverb Send knobs, i.e. the top row knobs with the green outline (a default setup in the Logic Notes song template).


Q: What is Space Designer?
A: Space Designer is Logic's convolution reverb plug-in. While conventional reverberation effects are based on reverb algorithms, Space Designer uses Impulse Responses instead, which are actually reverb samples, i.e. recordings of physical spaces such as auditoriums, halls and rooms.

During the convolution process, every sample in the audio input is multiplied by each sample in the Impulse Response (IR). Needless to say, overlaying the IR onto the input signal in real-time is a processor-intensive task. But with the availability of more powerful computers, convolution reverbs have become increasingly popular in recent years.

New Realism in Reverberation Technology: The Space Designer is a convolution reverb plug-in based on Impulse Responses (only available in Logic Pro).


Logic Pro 7 comes with a 400MB IR library. Consisting of stereo 24-bit audio files in AIFF and WAVE formats (beneath the SDIR file extension), these reverb samples are recordings of actual concert halls, cathedrals, recording studios, vintage reverb devices, tunnels and conventional rooms, among others.


Q: What is the best way to insert a reverb plug-in?
A: A reverberation effect is typically shared by multiple instruments. As such, it should not be put into an individual track’s insert slot. Since a reverb plug-in usually consumes more processing power than an average plug-in, an insert effect system (which requires a separate plug-in for each track) will only put unnecessary strain on the host computer’s CPU.

Reverb is more commonly used as an aux send effect. Setting up this effect bus will enable a single plug-in to be shared by multiple tracks:

1. Open the Audio Mixer or press 9 (to select Screenset 9) if using the Logic Notes song template.
2. Insert the desired reverb plug-in into an empty Bus channel strip.
3. Assign the selected reverb Bus (with the default Post fader option) to the desired Audio Track and Audio Instrument Sends slots.
4. Adjust the Send Level knob (in each assigned track) together with the Bus Volume fader for the desired reverb mix. (Also ensure that the plug-in’s Mix parameter, i.e. the dry/wet (direct signal/reverb effect) balance, is set to 100% for maximum effect.)

Aux Send Reverb: The Audio Mixer shows the PlatinumVerb plug-in inserted into Bus 1, with 3 Audio Tracks and 3 Audio Instruments sending various signal levels into Bus 1 (which is the reverb bus).


Reverberation is a subtle effect where it often stays in the background. Sometimes, we do not even notice it is there until it is removed from the mix. We cannot do without it, yet we cannot have too much of it either. As with everything else, the effect has to be there in just the right amount for proper balance. Happy mixing.

_____________________________________________________________________________________

Logic 7 downloads:

Logic Pro template v1.2
OR
Logic Express template v1.2

Logic Pro preferences v1.1
OR
Logic Express preferences v1.1

Read Me (template and preferences)


Plug-in presets from Logic Platinum 6

Read Me (plug-in presets): refer to Q3
__________________________________________________________________

Friday, July 13, 2007

Introducing Logic 7


Q: What is Logic 7?
A: Welcome back to Logic Notes with Sze. As it is the beginning of a new semester, it is only fitting to explain what Logic 7 is, what it can do and also highlight some of its features and applications.

Logic 7 is the complete music production software for Apple computers. It provides integrated MIDI sequencing, music notation and digital audio production capabilities, all within one application.

Logic 7 comes together with an extensive variety of effect and virtual instrument plug-ins, a fairly large sample library, support for Apple Loops (refer to the Apple Loops & Instant Gratification article for more info) as well as mixer and plug-in (effect and instrument) automation.

Logic 7: The all-in-one tool for all things audio, including audio for video post production.


Q: What is Logic 7 used for?
A: As a premier audio production tool, Logic 7 can be used for virtually any music production task. Some examples of these tasks would include:

- digital audio recording, editing, mixing and mastering
- audio sfx for video post production and scoring for video
- MIDI recording and sequence editing
- music notation editing with lyrics, chord symbols and drum notation
- virtual synthesizer and effects programming


Q: What is the difference between Logic Pro 7 and Logic Express 7?
A: Logic Pro 7 is Apple’s fully professional music production application while Logic Express is the scaled down and more affordable version. However, despite a less comprehensive toolset, it (Logic Express) still shares the same user interface as Logic Pro and is equipped with core features and tools that are more than capable of performing the standard music production tasks (e.g. 24/96 audio resolution, over 3GB sample library, Apple Loops support, video track, automation capabilities, etc).

The Logic 7 Family: The first difference between Logic Pro and Logic Express is… the size of the box. :-)


Q: What is WaveBurner?
A: WaveBurner is a CD mastering software that comes with Logic Pro 7. It is designed for optimizing stereo song mixes (e.g. level, tone, song order, pause length, fade-in/out, etc.) for the audio CD medium.

WaveBurner: The audio CD creation tool for mastering and burning your music production project to disc.


Q: Besides an Apple computer, does Logic 7 need any other equipment in order to work?
A: No, Logic 7 can run without any additional equipment. But as it is a software application, its performance is dependent on the supporting hardware. Hence, adding the following optional but recommended hardware devices will enhance the functionality and quality of the music production process:

- MIDI controller (e.g. MIDI keyboard to record the MIDI notes)
- MIDI interface (to connect to external MIDI equipment such as a keyboard synthesizer. However, this interface is not required if the MIDI device has a USB port or if the audio interface has built-in MIDI ports.)
- audio interface (for high quality audio recording with built-in mic preamps and for playback output. This will replace the computer’s built-in but noisy mic/line-in and line-out interface.)
- microphone (to record audio such as vocals)
- large capacity, external FireWire hard drive (for audio files only, to improve system performance)
- powered speakers and headphones (to listen to the playback)


Q: Is there any Logic product demo that I can see and hear?
A: Yes, there is. Many ICOM students have not seen the Logic Express 7 demo song, even though it is on their Logic DVD. And while the new m-Mobility students wait for their Apple MacBook Pro computers and Logic software, they can view the Logic Express 7 demo song below, as well as several others of my favorite demos from previous versions of Logic. These demos have been recorded into a video format so that they can be watched by anyone, including those who do not have the Logic software (QuickTime 7 required).

Logic Express 7 demo song (17")*


Logic Platinum 6 demo song


Logic Platinum 5 demo song


Emagic video


REX Appeal (third party) demo song


* Special thanks to Wee Jon and Chun for loaning their 17” MacBook Pro and Logic Express for the video recording.

_____________________________________________________________________________________

Logic 7 downloads:

Logic Pro template v1.2
OR
Logic Express template v1.2

Logic Pro preferences v1.1
OR
Logic Express preferences v1.1

Read Me (template and preferences)


Plug-in presets from Logic Platinum 6

Read Me (plug-in presets): refer to Q3
__________________________________________________________________

Thursday, May 17, 2007

How Do You Do?


Q: How do you do…???
A: Logic Notes with Sze has been online for almost one semester now. As we approach the end of the semester, there will be the customary rush to finish assignments and projects, together with questions that begin with “How do you do this...?” and “How do you do that...?” As such, this edition of Logic Notes will focus on answering some of these “How do you do…” questions.


Q: The previous Logic Notes article on Apple Loops was targeted at senior students using Logic Pro 7. But Logic Express 7 (used by new students) does not have a Chord track. How do you create a chord progression then (which the Apple Loops can follow during playback)?
A: Without the Chord track, Logic Express users cannot view the chord progression. But this lack of visual feedback will not affect the playback of Apple Loops in any way. The same results can still be obtained just by using the Transposition track.

In Logic Pro 7, the Chord track is linked to the Transposition track whereby any changes in either track will affect the other. In Logic Express 7, only the Transposition track is used, which will change the pitch of the Apple Loop to follow the chord progression (chord quality cannot be changed). For example, CMaj7 A-7 D-7 G7 (in the key of C) will have Transposition track settings 0 -3 +2 -5.

Transposition Track: The “I VI II V progression” in the above Global Track will pitch shift the Apple Loop as well as the MIDI Regions. To disable the transposition of MIDI Regions, check the No Transpose option in the Object Parameter Box (on the left of the Arrange Window).


Q: Last semester, you told me there was a Telephone preset in Logic’s Fat EQ plug-in which I should check out for my project. But I could not find this preset in Logic Pro 7’s Fat EQ. How do you explain that?
A: Many of the plug-in presets from Logic Platinum 6 were not made available in Logic 7. However, the entire library of Logic 6 presets (including the Fat EQ Telephone preset) can now be downloaded from the Logic 7 downloads section.

Simply unzip the downloaded presets file and drag both the Plug-In Settings and Impulse Responses folders into the following location (if there are any previously saved user presets, backup those files first and drop them back to the same location later):

Users/your user account/Library/Application Support/Logic

Click the Replace button (when the Copy dialog window appears). The Logic 7 presets will now be displayed from the Factory folder while the Logic 6 presets folder can be identified by one of several names - #Factory, factory 1, factory 2, #Factory Xtra Pack and Demo Presets.

Fat EQ: The Telephone preset can be loaded into Logic 7 to provide the “old recording” sound (besides an authentic telephone voice effect).


Q: How do you convert a MIDI sequence that uses QuickTime instruments into an mp3 file?
A: The bounce process (typically) enables a multitrack session to be mixed down and recorded into an audio file (AIFF, wave, AAC/m4a, mp3, etc). However, bouncing is only limited to internal audio signals (i.e. Audio Tracks and Audio Instruments). The QuickTime Synth is outside the Logic signal chain and cannot be recorded directly (just as the built-in synth on a standard Windows soundcard cannot be directly bounced when using other music production applications).

Fortunately, there are a couple of workarounds to overcome this limitation:
Solution #1 - Use Audio Instruments
a. Change each MIDI QuickTime track to an Audio Instrument track and select DLSMusicDevice (Stereo>AU Instruments>Apple).
b. Adjust the playback level (Audio>Audio Mixer or template Screenset 9) to avoid clipping.
c. Initiate the Bounce process (File>Bounce or click the Bounce button on the Audio Mixer’s Output channel strip).
d. Adjust the Bounce settings as needed (Destination: MP3, Start and End Positions, Save As, Where, etc). Click the Bounce button to begin the process.

The DLS Music Device uses the QuickTime Music Synthesizer sound bank. However, triggering multiple QuickTime sound banks simultaneously may result in a noisy playback but the excessive noise will not be recorded during an offline bounce.

DLS Music Device: This Audio Instrument plug-in can be used to replace Apple’s internal QuickTime Synth.


Alternatively, all the MIDI tracks can be merged into a single “Format 0” track to minimize the playback noise by using only 1 QuickTime Synth:
a. Select all the MIDI Regions and merge them (Glue tool or Region>Merge>Regions). When prompted, click the Convert button (to change the MIDI channels) in the dialog box.
b. Change the MIDI QuickTime track to an Audio Instrument track and select DLSMusicDevice (Stereo>AU Instruments>Apple).
c. In the Object Parameter Box (on the left of the Arrange Window), change the Audio Instrument’s MIDI channel to All.
d. Adjust the playback level (Audio>Audio Mixer or template Screenset 9) to avoid clipping.
e. Initiate the Bounce process (File>Bounce or click the Bounce button on the Audio Mixer’s Output channel strip).
f. Adjust the Bounce settings as needed (Destination: MP3, Start and End Positions, Save As, Where, etc). Click the Bounce button to begin the process.

Bounce Dialog Window: Various options for bouncing such as file type (wave, mp3, audio cd, etc), bounce location, bit rate and surround bounce format can be set in this window.


Solution #2 - Record the audio output of the QuickTime Synth:
a. Connect an audio cable from the computer’s audio output to its input.
b. Uncheck the Software Monitoring option (Audio>Audio Hardware and Drivers), if applicable, to avoid audio feedback.
c. Record enable/arm an Audio Track. Adjust the playback/record levels to avoid clipping (use the F4/F5 keys).
d. Record the sequence into the Audio Track - a PCM audio file (AIFF, wave, etc) will be created.
e. Initiate the Bounce process (File>Bounce or click the Bounce button on the Audio Mixer’s Output channel strip).
f. Adjust the Bounce settings as needed (Destination: MP3, Start and End Positions, Save As, Where, etc). Click the Bounce button to begin the process.
g. After everything has been completed, recheck the Software Monitoring option (if needed).


Q: Several new ICOM students downloaded the Logic preferences file but placed it into the wrong folder. How do you verify that the downloaded preferences file is actually working?
A: The easiest verification will be to check the File menu - the Close command should indicate ^W (i.e. Ctrl-W), a 2-key combination that is simpler to use than the Logic default. If the Close command shows a 3-key combination (Option-Command-W), this default setting indicates that the downloaded preferences file is inactive.

The Shorter Close: The downloaded preferences file provides a 2-key Close command (left picture) while Logic’s default is a 3-key Close command (right picture).


Besides containing Logic’s audio settings, the downloaded preferences file also provides several additional Key Commands, some of which are for functions that are not available in Logic’s menus. These functions can only be accessed through Key Commands. As an example, the function - Align Object Positions Vertically (to align chord symbols in the Score Editor, for MT010 Assignment 2) - can only be accessed via the Key Command, Shift-A.

The downloaded preferences file should not be dragged into the same folder as the Logic song template (a common mistake made by many students). Once again, the correct location for the Logic preferences file is:
Users/your user account/Library/Preferences/Logic


Q: What are the updates in the new Logic templates this month (the only question without “How do you…”;)?
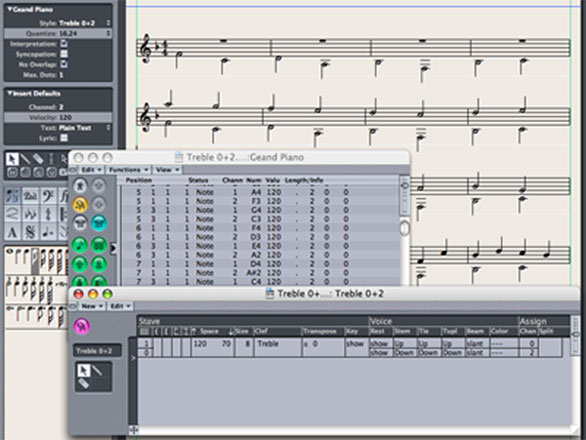
A: The updated Logic song templates have been added with 2 new Score Styles - Treble 0+2 and Bass 0+2. These additions will allow 2-voice polyphonic notation to be inserted into the staves, simply by using MIDI channel 2.

Score Style Window: Notes on channel 2 are assigned to Voice 2 while all other channels are assigned to Voice 1. The voice settings can also be adjusted easily for scores with occasional polyphonic passages (by setting Voice 1 Stem to Auto and Voice 2 Rest to Hide).


Both the new Logic Pro and Logic Express templates (v1.2) can be found in the Logic 7 downloads section.

As the semester holidays are fast approaching, Logic Notes with Sze will also be taking a break next month. But I will be back the following month in July 2007. See you then and have a nice holiday.

_____________________________________________________________________________________

Logic 7 downloads:

Logic Pro template v1.2
OR
Logic Express template v1.2

Logic Pro preferences v1.1
OR
Logic Express preferences v1.1

Read Me (template and preferences)


Plug-in presets from Logic Platinum 6

Read Me (plug-in presets): refer to Q3
__________________________________________________________________

Saturday, April 7, 2007

Apple Loops & Instant Gratification


Q: What will this month’s Logic Notes article be focusing on?
A: My previous two Logic Notes articles were targeted at 1st year ICOM students. Although I do know of some senior students who have downloaded the Logic song template, I haven’t yet written any Logic article with them in mind. As such, this month’s article will focus on a tool which the senior students especially, may find quite helpful (of course, it is also applicable to the 1st year students.)

Senior students are not easy to impress. A year ago, when ICOM started its m-Mobility laptop package, I found that one of the biggest attractions to these students is Logic’s support for Apple Loops. It is an instant gratification tool that requires minimal effort (hint, hint) to add professional sounding beats and instrument parts (more hints) to a commercial audio production or a school music project.


Q: What are Apple Loops?
A: Apple Loops are musical phrases that can be repeated seamlessly. They are pre-recorded, ready to use phrases that are typically between 1 - 4 measures in length. These audio and software instrument loops cover a variety of styles and various types of musical instrument phrases.


Q: How are Apple Loops different from other generic loops?
A: The Apple Loops file format contains tags which provide information about the loop’s tempo, key (not applicable to drum beats), instrument, genre, mood, etc. This information can be read by compatible audio production software such as Logic 7 and GarageBand. This compatibility enables the Apple Loops to follow the song’s tempo, key and chord progressions with automatic pitch shifting and time stretching “corrections” in real time.

Apple Loops Tags: The information in the tags can be entered in the Apple Loops Utility application.


Meanwhile, the categories in the Apple Loops tags provide a convenient way to search for the desired loops (by instrument, genre, mood, etc.). By only listing the matching loops, the search process will narrow down the choices, from the thousands to a much smaller and easier to manage size.


Q: What does an Apple Loop sound like?
A: The first audio clip is a 1-measure Apple Loop (Electric Slap 16) in its original tempo and key (AppleLoop.mp3).

The second audio clip is the same Apple Loop repeated over 4 measures, following the Logic song’s tempo, key and chord progression (AppleLoopWithChords.mp3).

The third audio clip is a stiff sounding MIDI file, exported from and typical of music notation software. Played back via Logic’s EXS24 soft sampler, this MIDI file serves as a comparison for the next audio example (NotationMIDI.mp3).

The fourth audio clip is the same MIDI file but added with as many Apple Loops as I could squeeze in. Tempting as it may be, this audio clip has been recorded as is, without any effects, i.e. no compression, EQ, reverb, etc. Can you hear each of the eight Apple Loops coming in one after another* in the very dense mix? (NotationMIDI+AppleLoops.mp3)

* New Apple Loops inserted at measures 5, 9, 10, 11, 13, 15, 17 and 21.


Q: How do I create a chord progression that the Apple Loops can follow during playback in Logic 7?
A: 1. In the Arrange Window’s View menu, ensure that the following are enabled:
a. View > Global Tracks
b. View > Global Track Components > Chord
c. View > Global Track Components > Transposition

2. Insert the chord progression using EITHER ONE of the following methods:
a. Select the appropriate MIDI Region(s) that contains the chord progression and click on the Analyze button in the Chord track, OR simply drag the appropriate MIDI Region(s) onto the Chord track (this analysis will automatically generate the chord progression), OR
b. Use the Pencil tool and click on the desired measure in the Chord track. Enter the relevant information into the Define Chord window that appears.

Chord Progression in the Global Tracks: Both the Chord and Transposition tracks are inter-related - any changes in either track will affect the other. As such, the entered chord progression will also be automatically reflected in the Transposition track.

Note: As pitched Apple Loops follow chord progressions via pitch transpositions, they cannot change their chord qualities (where applicable).


Q: How do I access the Apple Loops library in Logic 7?
A: From the Audio menu, select Loop Browser (Audio > Loop Browser). The Loop Browser is an interface which allows the user to quickly search, audition and import the desired Apple Loops into Logic.

Loop Browser: Simply select one or more categories in the matrix and a list of matching Apple Loops will appear.


Q: Why do some Apple Loops have a blue icon while others have a green icon?
A: Apple Loops with the blue sound wave icon can only be added to the Audio Track (edited as Audio Regions) while loops with the green note icon can be added to the Audio Track (edited as Audio Regions) as well as the Audio Instrument and MIDI tracks (edited as MIDI regions, e.g. note editing). Apple Loops that are added to the Audio Instrument track will be inserted together with their corresponding software instruments and effects.


Q: How do I import an Apple Loop into a Logic 7 song?
A: Simply drag the desired Apple Loop from the Loop Browser to the appropriate track and measure in the Arrange Window. This simple drag and drop procedure will then insert the relevant Apple Loop into the Logic song.


Q: How many Apple Loops are there?
A: Current Apple computers come included with a huge library of more than 1,000 great sounding loops. Thousands more Apple Loops can be added with the optional Jam Packs – presently, there are 4 other Jam Packs available: Remix Tools, Rhythm Section, Symphony Orchestra and World Music. Each Jam Pack contains more than 2,000 Apple Loops (more than 3,000 in the World Music pack)… installing all of them would provide more than 10,000 Apple Loops at your finger tips!


Q: Are there any new Logic Notes downloads this month?
A: Yes, the Logic song templates have been updated to show all Global Track Components in Screenset 3 while streamlining the hidden Global Tracks in the other screensets. The updated Logic templates (v1.1) can be found in the Logic 7 downloads section.

This new update will make it more convenient to integrate Apple Loops into Logic. After all, support for Apple Loops files is not found in other audio production software on the MS Windows platform (although they can be played back as regular AIFF audio files), so why not take advantage of it?

_____________________________________________________________________________________

Logic 7 downloads:

OR

OR


__________________________________________________________________