Monday, September 3, 2007

Reverberation Logic


Q: What is reverberation?
A: Reverberation is one of the most commonly used effects in music. Also known as reverb, it is the natural reflection of sound in an acoustic space. As a microphone typically captures only the direct sound from the source (without the room reflections), recordings without any reverb mixed in will sound very dry and unnatural. On the other hand, too much reverb will simply smear up the clarity of the mix, making it sound like the neighbor's karaoke nightmare (often with maximum effects to mask the bad singing)!


Q: Does Logic have any reverberation effect?
A: Yes, Logic comes with several reverb plug-ins such as PlatinumVerb, GoldVerb, SilverVerb, EnVerb and AVerb. However, the Space Designer is only available in Logic Pro while the Apple QuickTime synthesizer also has a built-in reverb effect.

Premium Reverb Plug-in: The PlatinumVerb is a powerful reverb plug-in that is available in both Logic Pro and Logic Express.


Reverb from External Synths: Built-in reverb from the QuickTime synth (an external device) can be dialed-in via the Track Mixer’s Reverb Send knobs, i.e. the top row knobs with the green outline (a default setup in the Logic Notes song template).


Q: What is Space Designer?
A: Space Designer is Logic's convolution reverb plug-in. While conventional reverberation effects are based on reverb algorithms, Space Designer uses Impulse Responses instead, which are actually reverb samples, i.e. recordings of physical spaces such as auditoriums, halls and rooms.

During the convolution process, every sample in the audio input is multiplied by each sample in the Impulse Response (IR). Needless to say, overlaying the IR onto the input signal in real-time is a processor-intensive task. But with the availability of more powerful computers, convolution reverbs have become increasingly popular in recent years.

New Realism in Reverberation Technology: The Space Designer is a convolution reverb plug-in based on Impulse Responses (only available in Logic Pro).


Logic Pro 7 comes with a 400MB IR library. Consisting of stereo 24-bit audio files in AIFF and WAVE formats (beneath the SDIR file extension), these reverb samples are recordings of actual concert halls, cathedrals, recording studios, vintage reverb devices, tunnels and conventional rooms, among others.


Q: What is the best way to insert a reverb plug-in?
A: A reverberation effect is typically shared by multiple instruments. As such, it should not be put into an individual track’s insert slot. Since a reverb plug-in usually consumes more processing power than an average plug-in, an insert effect system (which requires a separate plug-in for each track) will only put unnecessary strain on the host computer’s CPU.

Reverb is more commonly used as an aux send effect. Setting up this effect bus will enable a single plug-in to be shared by multiple tracks:

1. Open the Audio Mixer or press 9 (to select Screenset 9) if using the Logic Notes song template.
2. Insert the desired reverb plug-in into an empty Bus channel strip.
3. Assign the selected reverb Bus (with the default Post fader option) to the desired Audio Track and Audio Instrument Sends slots.
4. Adjust the Send Level knob (in each assigned track) together with the Bus Volume fader for the desired reverb mix. (Also ensure that the plug-in’s Mix parameter, i.e. the dry/wet (direct signal/reverb effect) balance, is set to 100% for maximum effect.)

Aux Send Reverb: The Audio Mixer shows the PlatinumVerb plug-in inserted into Bus 1, with 3 Audio Tracks and 3 Audio Instruments sending various signal levels into Bus 1 (which is the reverb bus).


Reverberation is a subtle effect where it often stays in the background. Sometimes, we do not even notice it is there until it is removed from the mix. We cannot do without it, yet we cannot have too much of it either. As with everything else, the effect has to be there in just the right amount for proper balance. Happy mixing.

_____________________________________________________________________________________

Logic 7 downloads:

Logic Pro template v1.2
OR
Logic Express template v1.2

Logic Pro preferences v1.1
OR
Logic Express preferences v1.1

Read Me (template and preferences)


Plug-in presets from Logic Platinum 6

Read Me (plug-in presets): refer to Q3
__________________________________________________________________

Friday, July 13, 2007

Introducing Logic 7


Q: What is Logic 7?
A: Welcome back to Logic Notes with Sze. As it is the beginning of a new semester, it is only fitting to explain what Logic 7 is, what it can do and also highlight some of its features and applications.

Logic 7 is the complete music production software for Apple computers. It provides integrated MIDI sequencing, music notation and digital audio production capabilities, all within one application.

Logic 7 comes together with an extensive variety of effect and virtual instrument plug-ins, a fairly large sample library, support for Apple Loops (refer to the Apple Loops & Instant Gratification article for more info) as well as mixer and plug-in (effect and instrument) automation.

Logic 7: The all-in-one tool for all things audio, including audio for video post production.


Q: What is Logic 7 used for?
A: As a premier audio production tool, Logic 7 can be used for virtually any music production task. Some examples of these tasks would include:

- digital audio recording, editing, mixing and mastering
- audio sfx for video post production and scoring for video
- MIDI recording and sequence editing
- music notation editing with lyrics, chord symbols and drum notation
- virtual synthesizer and effects programming


Q: What is the difference between Logic Pro 7 and Logic Express 7?
A: Logic Pro 7 is Apple’s fully professional music production application while Logic Express is the scaled down and more affordable version. However, despite a less comprehensive toolset, it (Logic Express) still shares the same user interface as Logic Pro and is equipped with core features and tools that are more than capable of performing the standard music production tasks (e.g. 24/96 audio resolution, over 3GB sample library, Apple Loops support, video track, automation capabilities, etc).

The Logic 7 Family: The first difference between Logic Pro and Logic Express is… the size of the box. :-)


Q: What is WaveBurner?
A: WaveBurner is a CD mastering software that comes with Logic Pro 7. It is designed for optimizing stereo song mixes (e.g. level, tone, song order, pause length, fade-in/out, etc.) for the audio CD medium.

WaveBurner: The audio CD creation tool for mastering and burning your music production project to disc.


Q: Besides an Apple computer, does Logic 7 need any other equipment in order to work?
A: No, Logic 7 can run without any additional equipment. But as it is a software application, its performance is dependent on the supporting hardware. Hence, adding the following optional but recommended hardware devices will enhance the functionality and quality of the music production process:

- MIDI controller (e.g. MIDI keyboard to record the MIDI notes)
- MIDI interface (to connect to external MIDI equipment such as a keyboard synthesizer. However, this interface is not required if the MIDI device has a USB port or if the audio interface has built-in MIDI ports.)
- audio interface (for high quality audio recording with built-in mic preamps and for playback output. This will replace the computer’s built-in but noisy mic/line-in and line-out interface.)
- microphone (to record audio such as vocals)
- large capacity, external FireWire hard drive (for audio files only, to improve system performance)
- powered speakers and headphones (to listen to the playback)


Q: Is there any Logic product demo that I can see and hear?
A: Yes, there is. Many ICOM students have not seen the Logic Express 7 demo song, even though it is on their Logic DVD. And while the new m-Mobility students wait for their Apple MacBook Pro computers and Logic software, they can view the Logic Express 7 demo song below, as well as several others of my favorite demos from previous versions of Logic. These demos have been recorded into a video format so that they can be watched by anyone, including those who do not have the Logic software (QuickTime 7 required).

Logic Express 7 demo song (17")*


Logic Platinum 6 demo song


Logic Platinum 5 demo song


Emagic video


REX Appeal (third party) demo song


* Special thanks to Wee Jon and Chun for loaning their 17” MacBook Pro and Logic Express for the video recording.

_____________________________________________________________________________________

Logic 7 downloads:

Logic Pro template v1.2
OR
Logic Express template v1.2

Logic Pro preferences v1.1
OR
Logic Express preferences v1.1

Read Me (template and preferences)


Plug-in presets from Logic Platinum 6

Read Me (plug-in presets): refer to Q3
__________________________________________________________________

Thursday, May 17, 2007

How Do You Do?


Q: How do you do…???
A: Logic Notes with Sze has been online for almost one semester now. As we approach the end of the semester, there will be the customary rush to finish assignments and projects, together with questions that begin with “How do you do this...?” and “How do you do that...?” As such, this edition of Logic Notes will focus on answering some of these “How do you do…” questions.


Q: The previous Logic Notes article on Apple Loops was targeted at senior students using Logic Pro 7. But Logic Express 7 (used by new students) does not have a Chord track. How do you create a chord progression then (which the Apple Loops can follow during playback)?
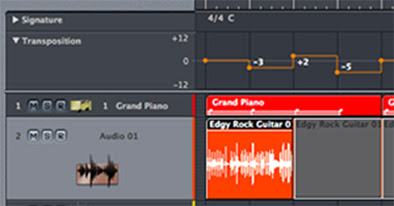
A: Without the Chord track, Logic Express users cannot view the chord progression. But this lack of visual feedback will not affect the playback of Apple Loops in any way. The same results can still be obtained just by using the Transposition track.

In Logic Pro 7, the Chord track is linked to the Transposition track whereby any changes in either track will affect the other. In Logic Express 7, only the Transposition track is used, which will change the pitch of the Apple Loop to follow the chord progression (chord quality cannot be changed). For example, CMaj7 A-7 D-7 G7 (in the key of C) will have Transposition track settings 0 -3 +2 -5.

Transposition Track: The “I VI II V progression” in the above Global Track will pitch shift the Apple Loop as well as the MIDI Regions. To disable the transposition of MIDI Regions, check the No Transpose option in the Object Parameter Box (on the left of the Arrange Window).


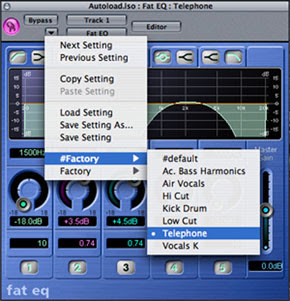
Q: Last semester, you told me there was a Telephone preset in Logic’s Fat EQ plug-in which I should check out for my project. But I could not find this preset in Logic Pro 7’s Fat EQ. How do you explain that?
A: Many of the plug-in presets from Logic Platinum 6 were not made available in Logic 7. However, the entire library of Logic 6 presets (including the Fat EQ Telephone preset) can now be downloaded from the Logic 7 downloads section.

Simply unzip the downloaded presets file and drag both the Plug-In Settings and Impulse Responses folders into the following location (if there are any previously saved user presets, backup those files first and drop them back to the same location later):

Users/your user account/Library/Application Support/Logic

Click the Replace button (when the Copy dialog window appears). The Logic 7 presets will now be displayed from the Factory folder while the Logic 6 presets folder can be identified by one of several names - #Factory, factory 1, factory 2, #Factory Xtra Pack and Demo Presets.

Fat EQ: The Telephone preset can be loaded into Logic 7 to provide the “old recording” sound (besides an authentic telephone voice effect).


Q: How do you convert a MIDI sequence that uses QuickTime instruments into an mp3 file?
A: The bounce process (typically) enables a multitrack session to be mixed down and recorded into an audio file (AIFF, wave, AAC/m4a, mp3, etc). However, bouncing is only limited to internal audio signals (i.e. Audio Tracks and Audio Instruments). The QuickTime Synth is outside the Logic signal chain and cannot be recorded directly (just as the built-in synth on a standard Windows soundcard cannot be directly bounced when using other music production applications).

Fortunately, there are a couple of workarounds to overcome this limitation:
Solution #1 - Use Audio Instruments
a. Change each MIDI QuickTime track to an Audio Instrument track and select DLSMusicDevice (Stereo>AU Instruments>Apple).
b. Adjust the playback level (Audio>Audio Mixer or template Screenset 9) to avoid clipping.
c. Initiate the Bounce process (File>Bounce or click the Bounce button on the Audio Mixer’s Output channel strip).
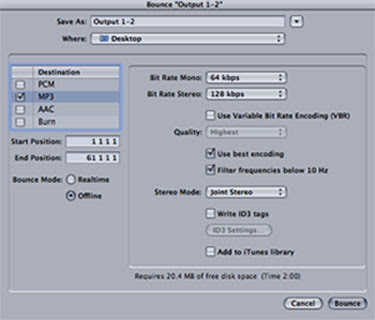
d. Adjust the Bounce settings as needed (Destination: MP3, Start and End Positions, Save As, Where, etc). Click the Bounce button to begin the process.

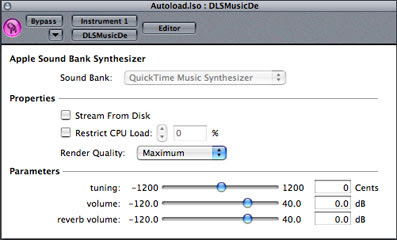
The DLS Music Device uses the QuickTime Music Synthesizer sound bank. However, triggering multiple QuickTime sound banks simultaneously may result in a noisy playback but the excessive noise will not be recorded during an offline bounce.

DLS Music Device: This Audio Instrument plug-in can be used to replace Apple’s internal QuickTime Synth.


Alternatively, all the MIDI tracks can be merged into a single “Format 0” track to minimize the playback noise by using only 1 QuickTime Synth:
a. Select all the MIDI Regions and merge them (Glue tool or Region>Merge>Regions). When prompted, click the Convert button (to change the MIDI channels) in the dialog box.
b. Change the MIDI QuickTime track to an Audio Instrument track and select DLSMusicDevice (Stereo>AU Instruments>Apple).
c. In the Object Parameter Box (on the left of the Arrange Window), change the Audio Instrument’s MIDI channel to All.
d. Adjust the playback level (Audio>Audio Mixer or template Screenset 9) to avoid clipping.
e. Initiate the Bounce process (File>Bounce or click the Bounce button on the Audio Mixer’s Output channel strip).
f. Adjust the Bounce settings as needed (Destination: MP3, Start and End Positions, Save As, Where, etc). Click the Bounce button to begin the process.

Bounce Dialog Window: Various options for bouncing such as file type (wave, mp3, audio cd, etc), bounce location, bit rate and surround bounce format can be set in this window.


Solution #2 - Record the audio output of the QuickTime Synth:
a. Connect an audio cable from the computer’s audio output to its input.
b. Uncheck the Software Monitoring option (Audio>Audio Hardware and Drivers), if applicable, to avoid audio feedback.
c. Record enable/arm an Audio Track. Adjust the playback/record levels to avoid clipping (use the F4/F5 keys).
d. Record the sequence into the Audio Track - a PCM audio file (AIFF, wave, etc) will be created.
e. Initiate the Bounce process (File>Bounce or click the Bounce button on the Audio Mixer’s Output channel strip).
f. Adjust the Bounce settings as needed (Destination: MP3, Start and End Positions, Save As, Where, etc). Click the Bounce button to begin the process.
g. After everything has been completed, recheck the Software Monitoring option (if needed).


Q: Several new ICOM students downloaded the Logic preferences file but placed it into the wrong folder. How do you verify that the downloaded preferences file is actually working?
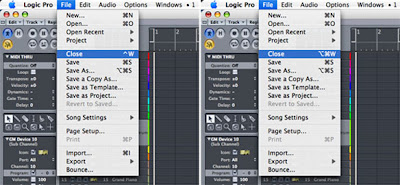
A: The easiest verification will be to check the File menu - the Close command should indicate ^W (i.e. Ctrl-W), a 2-key combination that is simpler to use than the Logic default. If the Close command shows a 3-key combination (Option-Command-W), this default setting indicates that the downloaded preferences file is inactive.

The Shorter Close: The downloaded preferences file provides a 2-key Close command (left picture) while Logic’s default is a 3-key Close command (right picture).


Besides containing Logic’s audio settings, the downloaded preferences file also provides several additional Key Commands, some of which are for functions that are not available in Logic’s menus. These functions can only be accessed through Key Commands. As an example, the function - Align Object Positions Vertically (to align chord symbols in the Score Editor, for MT010 Assignment 2) - can only be accessed via the Key Command, Shift-A.

The downloaded preferences file should not be dragged into the same folder as the Logic song template (a common mistake made by many students). Once again, the correct location for the Logic preferences file is:
Users/your user account/Library/Preferences/Logic


Q: What are the updates in the new Logic templates this month (the only question without “How do you…”;)?
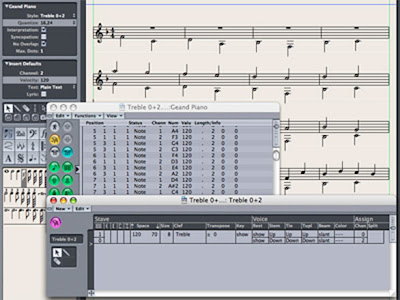
A: The updated Logic song templates have been added with 2 new Score Styles - Treble 0+2 and Bass 0+2. These additions will allow 2-voice polyphonic notation to be inserted into the staves, simply by using MIDI channel 2.

Score Style Window: Notes on channel 2 are assigned to Voice 2 while all other channels are assigned to Voice 1. The voice settings can also be adjusted easily for scores with occasional polyphonic passages (by setting Voice 1 Stem to Auto and Voice 2 Rest to Hide).


Both the new Logic Pro and Logic Express templates (v1.2) can be found in the Logic 7 downloads section.

As the semester holidays are fast approaching, Logic Notes with Sze will also be taking a break next month. But I will be back the following month in July 2007. See you then and have a nice holiday.

_____________________________________________________________________________________

Logic 7 downloads:

Logic Pro template v1.2
OR
Logic Express template v1.2

Logic Pro preferences v1.1
OR
Logic Express preferences v1.1

Read Me (template and preferences)


Plug-in presets from Logic Platinum 6

Read Me (plug-in presets): refer to Q3
__________________________________________________________________

Saturday, April 7, 2007

Apple Loops & Instant Gratification


Q: What will this month’s Logic Notes article be focusing on?
A: My previous two Logic Notes articles were targeted at 1st year ICOM students. Although I do know of some senior students who have downloaded the Logic song template, I haven’t yet written any Logic article with them in mind. As such, this month’s article will focus on a tool which the senior students especially, may find quite helpful (of course, it is also applicable to the 1st year students.)

Senior students are not easy to impress. A year ago, when ICOM started its m-Mobility laptop package, I found that one of the biggest attractions to these students is Logic’s support for Apple Loops. It is an instant gratification tool that requires minimal effort (hint, hint) to add professional sounding beats and instrument parts (more hints) to a commercial audio production or a school music project.


Q: What are Apple Loops?
A: Apple Loops are musical phrases that can be repeated seamlessly. They are pre-recorded, ready to use phrases that are typically between 1 - 4 measures in length. These audio and software instrument loops cover a variety of styles and various types of musical instrument phrases.


Q: How are Apple Loops different from other generic loops?
A: The Apple Loops file format contains tags which provide information about the loop’s tempo, key (not applicable to drum beats), instrument, genre, mood, etc. This information can be read by compatible audio production software such as Logic 7 and GarageBand. This compatibility enables the Apple Loops to follow the song’s tempo, key and chord progressions with automatic pitch shifting and time stretching “corrections” in real time.

Apple Loops Tags: The information in the tags can be entered in the Apple Loops Utility application.


Meanwhile, the categories in the Apple Loops tags provide a convenient way to search for the desired loops (by instrument, genre, mood, etc.). By only listing the matching loops, the search process will narrow down the choices, from the thousands to a much smaller and easier to manage size.


Q: What does an Apple Loop sound like?
A: The first audio clip is a 1-measure Apple Loop (Electric Slap 16) in its original tempo and key (AppleLoop.mp3).

The second audio clip is the same Apple Loop repeated over 4 measures, following the Logic song’s tempo, key and chord progression (AppleLoopWithChords.mp3).

The third audio clip is a stiff sounding MIDI file, exported from and typical of music notation software. Played back via Logic’s EXS24 soft sampler, this MIDI file serves as a comparison for the next audio example (NotationMIDI.mp3).

The fourth audio clip is the same MIDI file but added with as many Apple Loops as I could squeeze in. Tempting as it may be, this audio clip has been recorded as is, without any effects, i.e. no compression, EQ, reverb, etc. Can you hear each of the eight Apple Loops coming in one after another* in the very dense mix? (NotationMIDI+AppleLoops.mp3)

* New Apple Loops inserted at measures 5, 9, 10, 11, 13, 15, 17 and 21.


Q: How do I create a chord progression that the Apple Loops can follow during playback in Logic 7?
A: 1. In the Arrange Window’s View menu, ensure that the following are enabled:
a. View > Global Tracks
b. View > Global Track Components > Chord
c. View > Global Track Components > Transposition

2. Insert the chord progression using EITHER ONE of the following methods:
a. Select the appropriate MIDI Region(s) that contains the chord progression and click on the Analyze button in the Chord track, OR simply drag the appropriate MIDI Region(s) onto the Chord track (this analysis will automatically generate the chord progression), OR
b. Use the Pencil tool and click on the desired measure in the Chord track. Enter the relevant information into the Define Chord window that appears.

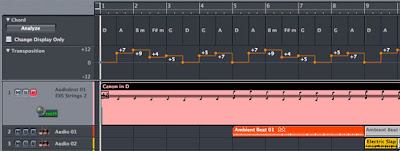
Chord Progression in the Global Tracks: Both the Chord and Transposition tracks are inter-related - any changes in either track will affect the other. As such, the entered chord progression will also be automatically reflected in the Transposition track.

Note: As pitched Apple Loops follow chord progressions via pitch transpositions, they cannot change their chord qualities (where applicable).


Q: How do I access the Apple Loops library in Logic 7?
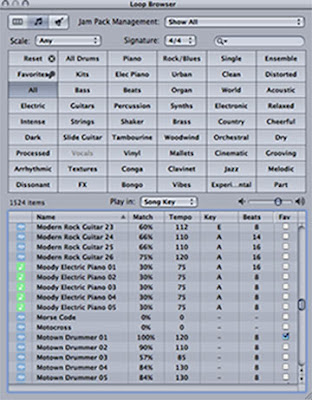
A: From the Audio menu, select Loop Browser (Audio > Loop Browser). The Loop Browser is an interface which allows the user to quickly search, audition and import the desired Apple Loops into Logic.

Loop Browser: Simply select one or more categories in the matrix and a list of matching Apple Loops will appear.


Q: Why do some Apple Loops have a blue icon while others have a green icon?
A: Apple Loops with the blue sound wave icon can only be added to the Audio Track (edited as Audio Regions) while loops with the green note icon can be added to the Audio Track (edited as Audio Regions) as well as the Audio Instrument and MIDI tracks (edited as MIDI regions, e.g. note editing). Apple Loops that are added to the Audio Instrument track will be inserted together with their corresponding software instruments and effects.


Q: How do I import an Apple Loop into a Logic 7 song?
A: Simply drag the desired Apple Loop from the Loop Browser to the appropriate track and measure in the Arrange Window. This simple drag and drop procedure will then insert the relevant Apple Loop into the Logic song.


Q: How many Apple Loops are there?
A: Current Apple computers come included with a huge library of more than 1,000 great sounding loops. Thousands more Apple Loops can be added with the optional Jam Packs – presently, there are 4 other Jam Packs available: Remix Tools, Rhythm Section, Symphony Orchestra and World Music. Each Jam Pack contains more than 2,000 Apple Loops (more than 3,000 in the World Music pack)… installing all of them would provide more than 10,000 Apple Loops at your finger tips!


Q: Are there any new Logic Notes downloads this month?
A: Yes, the Logic song templates have been updated to show all Global Track Components in Screenset 3 while streamlining the hidden Global Tracks in the other screensets. The updated Logic templates (v1.1) can be found in the Logic 7 downloads section.

This new update will make it more convenient to integrate Apple Loops into Logic. After all, support for Apple Loops files is not found in other audio production software on the MS Windows platform (although they can be played back as regular AIFF audio files), so why not take advantage of it?

_____________________________________________________________________________________
Logic 7 downloads:

OR

OR


__________________________________________________________________
Wednesday, February 28, 2007

Swingin’ It In Logic


Q: What is in this month’s Logic Notes article?
A: Hello again. Logic Notes with Sze is back with its second article. As ICOM’s new m-Mobility students are working on their 1st sequencing assignment, I will be expanding on the basic concept of quantization - more specifically, to discuss about swing quantization.


Q: First of all, what is quantization?
A: Quantization is the auto timing correction of recorded MIDI notes (or events). It is a standard sequencer feature that pulls a note to the nearest quantization beat. For example, a rhythmic pattern that has been played unevenly or a little off the beat (early or late) will be “corrected” by pulling the notes to align perfectly with the selected quantization beat.


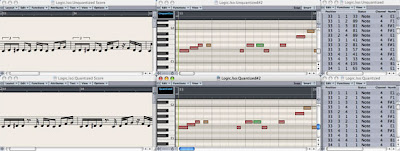
* Unquantized vs. Quantized: The top windows show the unquantized notes while the bottom windows show the quantized notes. Compare the differences... e.g. in the unquantized track, note the triplet notation, the loose alignment of notes to the Matrix grid and the somewhat random pulses (ticks) in the Position column.


* Unquantized (mp3)

* Quantized (mp3)

Quantization can do wonders for the amateur musician if the MIDI notes were loosely played. It can help tighten the rhythms but it is not magic – notes that have been recorded too far off the beat can be quantized the wrong way (i.e. pulled to the wrong quantization beat)!

So what do you do if that were to happen? Well, simply undo or delete the recording and try again.


Q: How do I select the proper quantization value?
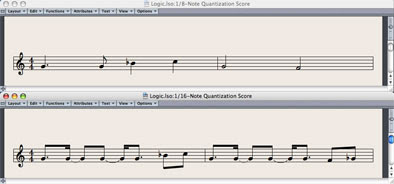
A: In most cases, you can simply choose the smallest rhythmic beat/subdivision in the MIDI recording as the quantization value.


Selecting Quantization Values: The top example can be quantized to an 8th note beat while the bottom example can be quantized to a 16th note beat.


Q: How is swing quantization different from the normal quantization?
A: Swing quantization pulls MIDI notes to align to uneven rhythmic beats whereby every 2nd beat is delayed by a preset value. This is in contrast to normal quantization, which aligns the notes to even rhythmic beats (e.g. swing 8th as opposed to straight 8th notes).


Q: What is the difference between the 16B Swing and say, the 16D Swing settings in Logic?
A: The various settings differ in the amount of swing that is applied to the quantization beats. The following examples best illustrate the concept:

• 16A Swing is straight 16th note quantization, i.e. at 50% swing (every beat is rhythmically even). It is also the same as the 1/16-Note setting.
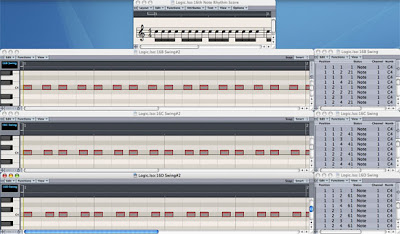
• 16B Swing is 54% swing quantization - every 2nd beat is delayed by 20 pulses (ticks).
• 16C Swing is 58% swing quantization - every 2nd beat is delayed by 40 pulses (ticks).
• 16D Swing is 63% swing quantization - every 2nd beat is delayed by 60 pulses (ticks).


Swing Intensities: The editing windows show the 16th notes quantized with (from top to bottom) 16B, 16C and 16D Swing settings. Compare the graphical note placements on the Matrix grids and the numerical delays in the pulses (ticks) column.


Q: What does swing quantization sound like?
A: Personally, I find that swing quantization is less stiff and has a better feel to it (more musical).


* Straight Quantization (mp3)

* Swing Quantization (mp3)


Q: What is the best swing quantization setting?
A: Mild to moderate swing settings (e.g. 16B-16D Swing) usually sound the best. But the most suitable setting will vary according to the actual musical context – try different settings and let your ears be the judge.


* 16B Swing (mp3)

* 16C Swing (mp3)

* 16D Swing (mp3)


Listen to entire sequence:

* MIDI Tutorial (mp3)


Q: What else should I be aware of?
A: Be wary of applying multiple swing quantization settings on different tracks. This can easily sound like slack timing, especially if there are rhythmic kicks in the tracks.


Q: Are there any Logic Notes updates available for downloading?
A: Yes, there is a minor update (v1.1) to the Logic preferences file in the Logic 7 downloads section - both the Metronome Tonality and Volume settings have been increased to make the click more audible.

If you have not already adjusted those metronome settings yourself, then this Logic Notes update may just help you keep time better during recording. Happy sequencing, be musical and just swing it right!


* Edited/recorded from the Emagic Logic 5/Logic 6 MIDI Tutorial sequence.


____________________________________________________________________________________

Logic 7 downloads:


OR

OR


__________________________________________________________________
Thursday, January 25, 2007

Getting Started: The Logic Template and Preferences


Q: What is this all about?
A: Greetings! Welcome to the first Logic Notes with Sze article. This will be a monthly column on the website and is dedicated to all things concerning Logic - the premier music production software for Apple computers.

In this inaugural article, you will find some downloads especially designed for ICOM students with the m-Mobility laptop package. I hope to include news updates, technical issues, explanations, FAQs, how-to guides, tips and so on in future articles. However, much will also depend on reader feedback in shaping the direction of this column in the coming months.


Q: There are several questions in the article. Why is this so?
A: The column will be adopting a Q&A concept. Every point/topic will have a question behind it, or if viewed alternatively, every question will be addressed by the answer that follows.

Moreover, the questions help summarize the article into smaller sections. This not only makes reading easier but also simplifies the searching of topics in the archives (for old articles).


Q: What is in this month's article?
A: There are 2 files available for download - a song template (Autoload.lso (Logic Pro) OR autoload.lso (Logic Express)) and a program preferences file (com.apple.logic.pro OR com.apple.logic.express).

The template is a default song which has been adapted and updated for Logic 7 on the 15” MacBook (1440x900 pixel screen resolution). The key features include:
1) 9 Screensets
2) an internal QuickTime Synth, connected to a GM Multi Instrument. (This pre-configured setting beats having to insert a new QuickTime Synth for each new song, but students/new users are advised to learn how to insert and connect the QuickTime Synth on their own.)

The key aspects of the preferences file include:
1) Logic’s audio settings
2) several additional Key Commands


Q: What is a Screenset and what are in those 9 Screensets?
A: A Screenset is a screen layout of various windows that can be stored and recalled at the touch of a key. Each Logic song can have a total of 90 Screensets.

The 9 Screensets in the Logic template are made up of the following:

Screenset 1 - MIDI Editors
Designed to expose users to the basic sequencing windows and shows the correlation between the three MIDI editing windows. Also a general-purpose layout for sequence recording, playback and editing.

Screenset 1: This is the default screen layout of the Logic Pro song template.


Screenset 2 - Track Mixer
Displays a mixer for all tracks listed in the Arrange Window. Also used for inserting MIDI sequence headers whereby the header messages can be monitored in the Event List.

Screenset 3 - Arrange Window
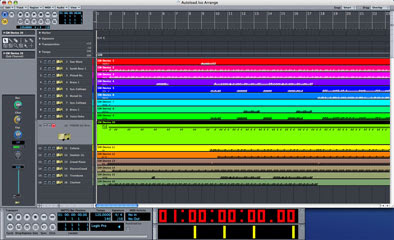
Large Region display with Global Tracks and giant bar & SMPTE counters (Logic Pro only). Minimal window displays.

Screenset 3: Notice the colorful Regions of the Logic Pro template, which are in contrast to the dull green color of Logic's default new song!


Screenset 4 - Score Editor
Large notation window, used for MT010 Assignment 2. The additional Event List monitors MIDI note messages as well as non-MIDI data (e.g. chord symbols).

Screenset 5 - Matrix Editor
Large piano roll window, used for graphical editing of MIDI notes.

Screenset 6 - Event List and Tempo Change Windows
The large Event List is used for precise editing and for monitoring all types of recorded data. Tempo changes can be made via the Tempo List, Tempo Track or tempo fader.

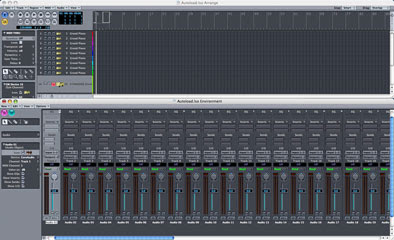
Screenset 7 - Audio Mixer (Audio Tracks)
Used for assigning efx plug-ins, mixing and monitoring signal clipping.

Screenset 7: The song template is digital audio ready with a large Audio Mixer window to support the production process.


Screenset 8 - Audio Mixer (Audio Instruments)
Used for assigning softsynths, efx plug-ins, mixing and monitoring signal clipping.

Screenset 9 - Audio Mixer (Buses and Output)
Buses are used for send efx (e.g. reverb, chorus) and submixes. This mixer layout is used for assigning the send efx plug-ins, mixing efx returns and monitoring signal clipping.
The Output is used for assigning master (global) efx plug-ins and for monitoring master signal clipping. Also used for bouncing the mix to a stereo file format (AIFF, wave, mp3, AAC, Audio CD).


Q: Where should I place these 2 downloaded files?
A: Just drag and drop the Logic template file into the following folder:
Users/your user account/Library/Application Support/Logic/Song Templates

The Logic preferences file should be placed in:
Users/your user account/Library/Preferences/Logic

I hope the above 2 downloads will be helpful to the new (and also the “less new”) ICOM students in getting started with Logic. If you have any comments and suggestions, please feel free to provide me with your feedback. Wishing everyone a productive year ahead. Happy 2007.

_____________________________________________________________________________________
Logic 7 downloads:

__________________________________________________________________