A: Logic Notes with Sze has been online for almost one semester now. As we approach the end of the semester, there will be the customary rush to finish assignments and projects, together with questions that begin with “How do you do this...?” and “How do you do that...?” As such, this edition of Logic Notes will focus on answering some of these “How do you do…” questions.
Q: The previous Logic Notes article on Apple Loops was targeted at senior students using Logic Pro 7. But Logic Express 7 (used by new students) does not have a Chord track. How do you create a chord progression then (which the Apple Loops can follow during playback)?
A: Without the Chord track, Logic Express users cannot view the chord progression. But this lack of visual feedback will not affect the playback of Apple Loops in any way. The same results can still be obtained just by using the Transposition track.
In Logic Pro 7, the Chord track is linked to the Transposition track whereby any changes in either track will affect the other. In Logic Express 7, only the Transposition track is used, which will change the pitch of the Apple Loop to follow the chord progression (chord quality cannot be changed). For example, CMaj7 A-7 D-7 G7 (in the key of C) will have Transposition track settings 0 -3 +2 -5.
Transposition Track: The “I VI II V progression” in the above Global Track will pitch shift the Apple Loop as well as the MIDI Regions. To disable the transposition of MIDI Regions, check the No Transpose option in the Object Parameter Box (on the left of the Arrange Window).
Q: Last semester, you told me there was a Telephone preset in Logic’s Fat EQ plug-in which I should check out for my project. But I could not find this preset in Logic Pro 7’s Fat EQ. How do you explain that?
A: Many of the plug-in presets from Logic Platinum 6 were not made available in Logic 7. However, the entire library of Logic 6 presets (including the Fat EQ Telephone preset) can now be downloaded from the Logic 7 downloads section.
Simply unzip the downloaded presets file and drag both the Plug-In Settings and Impulse Responses folders into the following location (if there are any previously saved user presets, backup those files first and drop them back to the same location later):
Users/your user account/Library/Application Support/Logic
Click the Replace button (when the Copy dialog window appears). The Logic 7 presets will now be displayed from the Factory folder while the Logic 6 presets folder can be identified by one of several names - #Factory, factory 1, factory 2, #Factory Xtra Pack and Demo Presets.

Fat EQ: The Telephone preset can be loaded into Logic 7 to provide the “old recording” sound (besides an authentic telephone voice effect).
Q: How do you convert a MIDI sequence that uses QuickTime instruments into an mp3 file?
A: The bounce process (typically) enables a multitrack session to be mixed down and recorded into an audio file (AIFF, wave, AAC/m4a, mp3, etc). However, bouncing is only limited to internal audio signals (i.e. Audio Tracks and Audio Instruments). The QuickTime Synth is outside the Logic signal chain and cannot be recorded directly (just as the built-in synth on a standard Windows soundcard cannot be directly bounced when using other music production applications).
Fortunately, there are a couple of workarounds to overcome this limitation:
Solution #1 - Use Audio Instruments
a. Change each MIDI QuickTime track to an Audio Instrument track and select DLSMusicDevice (Stereo>AU Instruments>Apple).
b. Adjust the playback level (Audio>Audio Mixer or template Screenset 9) to avoid clipping.
c. Initiate the Bounce process (File>Bounce or click the Bounce button on the Audio Mixer’s Output channel strip).
d. Adjust the Bounce settings as needed (Destination: MP3, Start and End Positions, Save As, Where, etc). Click the Bounce button to begin the process.
The DLS Music Device uses the QuickTime Music Synthesizer sound bank. However, triggering multiple QuickTime sound banks simultaneously may result in a noisy playback but the excessive noise will not be recorded during an offline bounce.

DLS Music Device: This Audio Instrument plug-in can be used to replace Apple’s internal QuickTime Synth.
Alternatively, all the MIDI tracks can be merged into a single “Format 0” track to minimize the playback noise by using only 1 QuickTime Synth:
a. Select all the MIDI Regions and merge them (Glue tool or Region>Merge>Regions). When prompted, click the Convert button (to change the MIDI channels) in the dialog box.
b. Change the MIDI QuickTime track to an Audio Instrument track and select DLSMusicDevice (Stereo>AU Instruments>Apple).
c. In the Object Parameter Box (on the left of the Arrange Window), change the Audio Instrument’s MIDI channel to All.
d. Adjust the playback level (Audio>Audio Mixer or template Screenset 9) to avoid clipping.
e. Initiate the Bounce process (File>Bounce or click the Bounce button on the Audio Mixer’s Output channel strip).
f. Adjust the Bounce settings as needed (Destination: MP3, Start and End Positions, Save As, Where, etc). Click the Bounce button to begin the process.

Bounce Dialog Window: Various options for bouncing such as file type (wave, mp3, audio cd, etc), bounce location, bit rate and surround bounce format can be set in this window.
Solution #2 - Record the audio output of the QuickTime Synth:
a. Connect an audio cable from the computer’s audio output to its input.
b. Uncheck the Software Monitoring option (Audio>Audio Hardware and Drivers), if applicable, to avoid audio feedback.
c. Record enable/arm an Audio Track. Adjust the playback/record levels to avoid clipping (use the F4/F5 keys).
d. Record the sequence into the Audio Track - a PCM audio file (AIFF, wave, etc) will be created.
e. Initiate the Bounce process (File>Bounce or click the Bounce button on the Audio Mixer’s Output channel strip).
f. Adjust the Bounce settings as needed (Destination: MP3, Start and End Positions, Save As, Where, etc). Click the Bounce button to begin the process.
g. After everything has been completed, recheck the Software Monitoring option (if needed).
Q: Several new ICOM students downloaded the Logic preferences file but placed it into the wrong folder. How do you verify that the downloaded preferences file is actually working?
A: The easiest verification will be to check the File menu - the Close command should indicate ^W (i.e. Ctrl-W), a 2-key combination that is simpler to use than the Logic default. If the Close command shows a 3-key combination (Option-Command-W), this default setting indicates that the downloaded preferences file is inactive.

The Shorter Close: The downloaded preferences file provides a 2-key Close command (left picture) while Logic’s default is a 3-key Close command (right picture).
Besides containing Logic’s audio settings, the downloaded preferences file also provides several additional Key Commands, some of which are for functions that are not available in Logic’s menus. These functions can only be accessed through Key Commands. As an example, the function - Align Object Positions Vertically (to align chord symbols in the Score Editor, for MT010 Assignment 2) - can only be accessed via the Key Command, Shift-A.
The downloaded preferences file should not be dragged into the same folder as the Logic song template (a common mistake made by many students). Once again, the correct location for the Logic preferences file is:
Users/your user account/Library/Preferences/Logic
Q: What are the updates in the new Logic templates this month (the only question without “How do you…”;)?
A: The updated Logic song templates have been added with 2 new Score Styles - Treble 0+2 and Bass 0+2. These additions will allow 2-voice polyphonic notation to be inserted into the staves, simply by using MIDI channel 2.
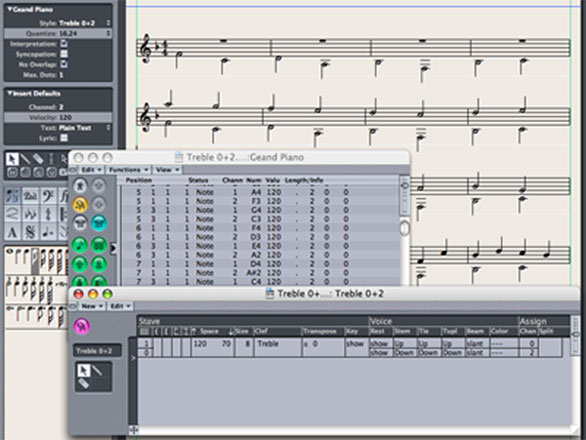
Score Style Window: Notes on channel 2 are assigned to Voice 2 while all other channels are assigned to Voice 1. The voice settings can also be adjusted easily for scores with occasional polyphonic passages (by setting Voice 1 Stem to Auto and Voice 2 Rest to Hide).
Both the new Logic Pro and Logic Express templates (v1.2) can be found in the Logic 7 downloads section.
As the semester holidays are fast approaching, Logic Notes with Sze will also be taking a break next month. But I will be back the following month in July 2007. See you then and have a nice holiday.
_____________________________________________________________________________________
Logic 7 downloads:
Logic Pro template v1.2
OR
Logic Express template v1.2
Logic Pro preferences v1.1
OR
Logic Express preferences v1.1
Read Me (template and preferences)
Plug-in presets from Logic Platinum 6
Read Me (plug-in presets): refer to Q3
__________________________________________________________________