Q: What is MainStage?
A: MainStage is an application software that has been optimized for use in live performance. It is a part of the Logic Studio package and can access instrument and effects plug-ins (although processor intensive effects are excluded from MainStage v1) in a similar way to the Logic Pro application. Functionally, MainStage thus becomes a software-based sound module and/or effects processor on stage.
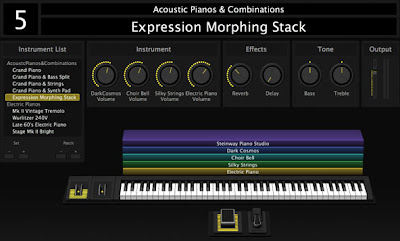
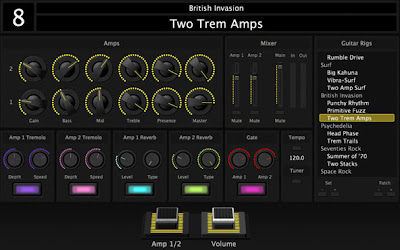
The keyboard layer patch (top) functions as a sound module while the guitar rig patch (bottom) functions as an effects processor.
Q: How do I connect my MIDI keyboard controller to MainStage?
A: If a USB port is available, use that to connect the MIDI keyboard to MainStage. But if there are no USB ports, then a MIDI Interface will be needed to connect a MIDI port (on the keyboard) to the USB port (on the computer).
However, most ICOM students already own a Digidesign Mbox 2 Pro - a FireWire audio interface with built-in MIDI ports - which can be used in place of a dedicated MIDI Interface. Setting it up is just a matter of plug and play - simply connect the:
- FireWire port on the Mbox 2 Pro to the FireWire port on the computer.
- MIDI Out of the keyboard to MIDI In on the MBox 2 Pro.
No other setup is required (assuming that the Mbox 2 Pro is already working properly with Pro Tools). In addition, MainStage's instrument sounds (audio signals) can also be output via Mbox 2 Pro (see next question below for further instructions).
Q: How do I connect my microphone or guitar to MainStage for effects processing?
A: An audio interface will be needed to input high quality audio signals (mic, guitar, bass, etc.) into MainStage. For ICOM students who already have the Mbox 2 Pro (both FireWire and USB audio interfaces can be used), simply follow the steps below:
- connect the FireWire port on the Mbox 2 Pro to the FireWire port on the computer.
- connect the Monitor Outputs on the Mbox 2 Pro to the sound system inputs.
- select the Mbox 2 Pro audio driver
(go to: MainStage > Preferences, Audio/MIDI, Audio Output AND Audio Input: select "Digidesign Mbox 2 Pro" for both).
- connect the mic / guitar output to the Mic (back panel) / DI (front panel) input respectively on the Mbox 2 Pro (press the Mic / DI source selector button on the front panel to select the relevant input).
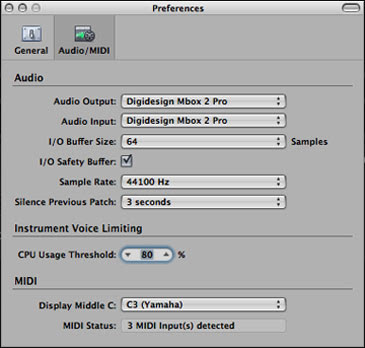
The MainStage Preferences window shows Digidesign Mbox 2 Pro as the selected device for both Audio Output and Input.
Q: What is a buffer and what is the best buffer size?
A: A buffer is a small amount of RAM that is used to hold data temporarily in a queue to supply a continuous stream of audio signals. The amount of data that is put on "standby" is determined by the buffer size (typically ranging from 32 - 1,024 audio samples).
If the buffer size is too small, the audio data in the queue may be used up before the CPU is able to refill that buffer. This interruption will result in a gap in the audio stream which is heard as a pop, click or even distortion in more severe cases.
However, if the buffer size is too large, there would be too much latency, which is the time delay between the input (audio signals from the mic, guitar or MIDI signals from the keyboard controller) and the output (sound at the speakers). This is because more data in a bigger buffer will take a longer time to be used up before the next buffer (containing your newly played audio signals) is accessed.
Therefore, the best buffer size setting would usually be the smallest possible buffer size (to minimize the latency) without any audible glitches (buffer large enough to provide sufficient time for the CPU to process the audio signals with all the necessary plug-ins and to refill that buffer before the data is used up). This optimal buffer setting would vary depending on each computer's specification and configuration, and is best obtained by testing various buffer sizes with musical input (from a mic, guitar, MIDI keyboard controller, etc).
Q: What is the organizational structure of a MainStage file?
A: A MainStage file is known as a Concert and opens in Edit Mode by default. Within each Concert are Sets (folders) of individual sounds called Patches.
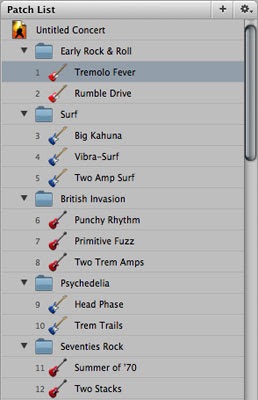
The MainStage Patch List shows the hierarchy of a Concert, Set and Patch.
Each Concert also contains a Layout which provides the MainStage visual interface with Screen Controls such as keyboards, faders, knobs, buttons, pedals, drum pads and other objects.
Q: How do I assign a hardware controller to a Screen Control?
A: Assigning a (connected) MIDI hardware controller to a MainStage Screen Control is a fairly simple process:
- go to Layout Mode
- select the desired Screen Control
- enable the Learn button
- move the desired hardware controller
- disable the Learn button
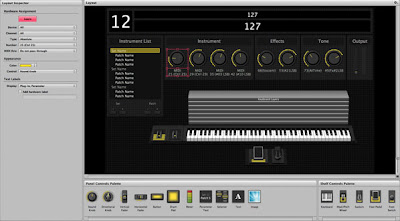
The Screen Control selection and the Learn button both turn red when learn mode is enabled.
Q: What other points of interest should I be aware of when using MainStage?
A: If you are using a MIDI keyboard controller, the unique Floating Split Point enables the key range boundary of an instrument to be extended, as you play within 1 octave of the keyboard split point (number of key extensions adjustable in the Floating Split parameter).
Also, if you are creating a new Patch, the big library of Channel Strip Settings can be used to provide a good starting point and are easily accessible:
- in Edit Mode, click the Setting button near the top of the channel strip, or
- select a channel strip and select the desired setting from the Channel Strip Settings column browser (below the main Workspace/Parameter Mapping area).
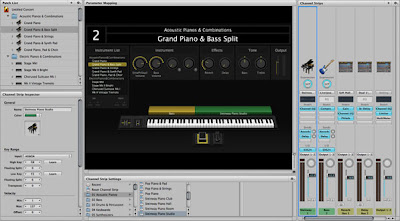
The Floating Split parameters are located in the Channel Strip Inspector (bottom left) while the Channel Strip Settings browser (bottom center) corresponds to the selected Channel Strip (right).
During your live performance, remember to quit all other applications. More opened applications mean having less CPU and memory resources available to MainStage.
Q: What is your opinion of the new Logic Studio?
A: The recently released Logic Studio package contains Logic Pro 9, MainStage 2 and new versions of other pro applications as well. It appears to be an exciting release, especially for guitarists, with the inclusion of the new Amp Designer and Pedalboard effects plug-ins.
With MainStage 2 now being able to use ALL of the Logic Studio effects plug-ins (except for surround plug-ins), the previously unavailable Pitch Correction plug-in could be a welcome addition for vocalists. However, some processor-intensive plug-ins can introduce latency and it remains to be seen if live pitch correction can indeed be applied smoothly in MainStage 2.
I can only write more after I have received my copy of Logic Studio "9". In the meantime, I will continue to look forward to checking out Apple's claim that the new Logic Studio is, "all things to all musicians"!
_____________________________________________________________________________________Logic Pro 8 downloads:
Project Template v1.2
Preferences v1.2
__________________________________________________________________


