
Q: What is Flex Time?
A: Flex Time is Logic's version of Elastic Audio (Pro Tools) or Audio Warp (Cubase). A Time Compression/Expansion (TCE) tool for manipulating digital audio, it is typically used to adjust the timing and tempo of audio recordings, samples and loops.
Q: Some of the audio recordings in my Logic multitrack session are not tight (out of sync). Can these timing problems be fixed without re-recording the tracks?
A: Yes, slack timing in your recordings can be tightened - simply enable Flex Time and manually drag the relevant transient to snap it to the bar/beat grid (or to the groove of another track). Alternatively, the selected audio region can also be quantized to automatically snap the detected transients to a quantization grid (result dependent on the audio content).
Similarly, imported audio loops may not always sync to the beat/groove of a project (loops may be slightly swung vs. straight feel, laid-back vs. edgy groove, etc). As with multitrack recordings, Flex Time can be applied in the same way to tighten the timing of these loops.

The Flex Markers in the lower region have been manually created from clicking/dragging while Flex Markers in the upper region have been automatically created from quantization (and further tightened with a manually adjusted Flex Marker on the right).
Audio recordings* from the above screenshot:
* A recorded clip of the full song context is available at the end of this article.
Q: How do I get started with Flex Time?
A: A simple 3-step process should get you started with Flex Time in Logic:
1. Click the Flex View button (in the Toolbar) to enable it, OR press command F. A Flex Mode button will appear in each audio track header.
2. Select a Flex Mode (click its button for the pop-up menu). The entire audio file(s) on that track* will then be analyzed, whereby detected transients will be indicated by Transient Markers (aka Event Markers in Pro Tools).
* Flex Time can also be independently enabled/disabled for individual audio regions on the same track, via the Flex checkbox in the Inspector.
3a. Dragging a Transient Marker will change it into a Flex Marker (aka Warp Marker in Pro Tools) and snap to the bar/beat grid (smaller subdivisions when zoomed in). The waveform display will turn green to indicate Time Compression** or orange for Time Expansion.
3b. Alternatively (to step 3a), select the audio region in the Flex Time-analyzed-track and apply an appropriate Quantize setting (via the Inspector). The relevant Transient Markers will turn into Flex Markers and snap to the selected quantization grid. As described above, the waveform display will turn green or orange to indicate Time Compression** or Time Expansion, respectively.
** However, if a Flex Marker time compresses an audio section to/to less than 12.5% (1/8) of its original length, the waveform display will turn (from green to) red in color.

The 3-steps to getting started with Flex Time are found in the Toolbar (step 1), track header (step 2) and audio region (step 3a) OR Inspector (step 3b).
The Flex Time audio region will now follow tempo changes in the Logic project, just like a MIDI region would, and without changing the pitch either (unless the Speed/Tempophone Flex Modes have been selected).
Q: I can only snap my Flex Marker to the bar/beat grid. Is it possible to snap this marker to a rhythmic beat/groove on another track instead?
A: Yes, dragging a Flex Marker (from one track) over the audio region on another track, will snap it to either a Transient or Flex Marker on that second track (both tracks must be Flex Time enabled).

The Flex Marker from the lower track snaps to a Transient Marker in the upper track when it (Flex Marker) is dragged over the upper audio region.
This will make it possible for an audio track (such as bass or percussion) to lock to the groove of another track (such as a drum beat).
Q: How do I delete a Flex Marker?
A: Flex Markers which have been manually created (from dragging) or automatically created (from quantization) can be deleted through ONE of several methods:
• double-click on the Flex Marker
• Eraser tool
• control-click/right-click and select a Delete Flex Marker option

Control-click/right-click away from (not directly on top of) a Flex Marker to delete: all manually created Flex Markers only OR all manually and automatically created Flex Markers.
Similarly, a Flex Marker's position can be reset through the same method:
• control-click/right-click on the marker and select Set To Neutral Position
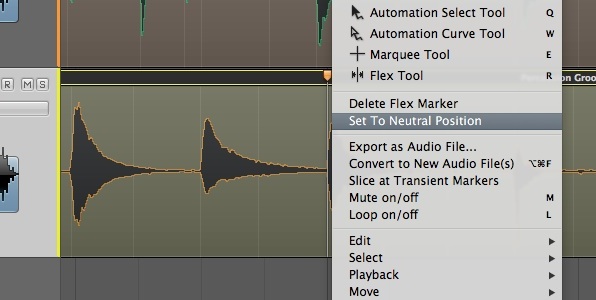
Control-click/right-click on a Flex Marker to delete it/reset its position.
Q: The various types of Flex Time pointers are so confusing - what do they mean?
A: The following diagrams show various types of Flex Time pointers, the actions that produce them and their functions in Flex Time editing operations. Each screenshot displays a different pointer (before editing) in the left region while the right region illustrates the function of that pointer (after editing).
Action: Hover over Transient Marker in upper half of audio region (see left region).
Function: Click on top of selected Transient Marker to add new Flex Marker (see right region).

Action: Hover over background space in upper half of audio region (see left region).
Function: Click at current pointer position to add new Flex Marker (see right region).

Action: Hover over Flex Marker in upper half of audio region (see left region).
Function: Drag left/right to move Flex Marker with TCE applied (see right region).

Action: Option-hover over Flex Marker in upper half of audio region (see left region).
Function: Drag left/right to only reposition the Flex Marker, with no TCE applied (see right region).
Action: Hover over Transient Marker in lower half of audio region (see left region).
Function: Click to add 3 new Flex Markers - on top of the selected, preceding and following Transient Markers (see right region).

Action: Hover over background space in lower half of audio region (see left region).
Function: Click to add 3 new Flex Markers - at current pointer position, and at the preceding and following Transient Markers (see right region).

Action: Hover over Flex Marker in lower half of audio region (see left region).
Function: Drag left/right to move selected Flex Marker with TCE applied, and add new Flex Markers at the preceding and following Transient Markers (if not already added), (see right region).

Action: Option-hover anywhere in lower half of audio region (see left region).
Function: Drag left/right to make a Marquee selection (see right region) or click to select the entire audio region.

Action: Option-hover over lower L/R region corners (see left region) OR hover over upper L/R region corners.
Function: Drag left/right to move region border, with TCE applied equally to the entire audio region (see right region).
Q: There are too many Transient Markers in my audio region. How do I stop these markers from being generated by the small transients?
A: Transient detection sensitivity in Flex Time can be changed in the Sample Editor (via the Sample Editor button above the Transport Bar OR press W). Ensure that the Transient Editing Mode is enabled (indicated by an orange button), then click on the +/- button to increase/decrease the number of Transient Markers (similar to the Event Sensitivity parameter in Pro Tools).
Enabling the Transient Editing Mode (orange button) will display the +/- buttons (indicated by a red arrow) that are used to increase/decrease the number of Transient Markers.
Transient Markers can also be moved, added and deleted in the Sample Editor. However, to reset the edited Transient Markers, go to:
• Audio File > Detect Transients
Q: What does the Varispeed function do?
A: Varispeed alters the playback/recording speed of the entire Logic multitrack project. It affects the audio (Flex-enabled or Flex-disabled) and MIDI tracks, loops and even video playback.

The Varispeed controls in the Transport Bar turn orange when enabled.
Some typical applications of Varispeed include previewing a multitrack project at a faster or slower tempo and transcribing/practicing/recording a performance at a lower speed.
However, the Varispeed controls are hidden by default but can be easily displayed:
• control-click/right-click the Transport Bar, select Customize Transport Bar, and enable the Varispeed display.
Q: What is Fade Playback Speed?
A: Fade Playback Speed is another tempo related function in Logic whereby region fade ins and fade outs can be speeded up and slowed down respectively. Independently selectable via the Region Parameter box in the Inspector, each option simulates the analog tape speedup or slowdown effect.

The orange fade out at the end of the region can be changed to a Fade Slow Down (indicated by the red arrow) in the Inspector.
Audio clip of the full song context for the various screenshots (with manual Flex Time editing applied to only the Tabla track), and the addition of a Fade Slowdown at the end:

_____________________________________________________________________________________
Logic Pro 9 downloads:
__________________________________________________________________
No comments:
Post a Comment